Showing posts with label recipes. Show all posts

April 18, 2013

Honey Wheat Seeded Bread

This is my Dad's favorite bread recipe. Because of that, it has a special place in my heart. While my father-in-law is recovering from his car accident amazingly, my Dad is not getting better. He is still in experimental treatments and wondering what will happen next. I'm so impressed with the way Mom and he are handling all of this...one day at a time. I'm grateful for whatever time we have left, but it's hard to think about what's happening inside his body. Cancer is so unpredictable...it pretty much sucks. Some of the things he loved to eat before, don't even taste good to him anymore. That's where the bread comes in.

If there is anything I can do to make Dad's life a little happier right now, I'm all for it. And this bread seems to make him happy. Sometimes it's as simple as a loaf of fresh bread. It's really all I can do.

I love you Dad.

Honey Wheat Seeded Bread
Ingredients
2 packets yeast (or two tbsp)
1 c warm water
1 1/2 c warm milk
2 eggs
1/2 c honey
1/4 c sugar
2 tsp salt
1/4 c oil
3 c wheat flour
2 c white flour (or go all wheat)
1/4 c wheat germ

1/4 c sesame seeds
1/4 c sunflower seeds
1 egg white
water

Combine water
and yeast in a glass measuring cup to allow yeast to proof {For specifics on bread making and yeast, see this post.} The water should feel warm to your fingers, but not hot.
Once your yeast is proofed (or should that be "proved itself") pour it into a large stand mixer bowl. Add the milk, honey, sugar, salt and oil. Blend together. Add the wheat flour and blend together using a dough hook on the mixer. Add 1 cup of the white flour and reserve the rest of the flour. Add the wheat germ and seeds.
You want to knead the dough in the mixer for about 5 minutes until the it's smooth, adding small amounts of the remaining 1 cup of flour a little at a time until the dough pulls away from the sides of the bowl, forming a ball. You may not use all of the flour if it's a dry day or you may need a little more if it's a humid day outside, but you shouldn't vary more than 1/2 c more or less in what you need.

Put your dough into a greased bowl and cover it loosely with plastic wrap. Let it sit in a warm place until it doubles in bulk. This should take around 1 hour unless your kitchen is pretty cold. You can figure out if yeast bread is ready with the
poke test. 
When the dough passes the poke test, you need to gently deflate it by folding it or "punching" it down. Then let the dough rest for 5 minutes or so (which means just leave it alone for a few minutes).
Cut dough into two portions and shape into loaves. Put in greased loaf pans and cover loosely again. Let rise for 30 minutes.
To make the top look pretty, brush it with a little egg white and water wash (which means use fork to mix some egg white and water). Then sprinkle on oatmeal, seeds, wheat germ. The egg wash works like glue and holds it all on the top - looking like it came from a fancy bakery.
Bake in 350 degree oven for 30 minutes. Cool on racks.

Try giving this loaf of fresh bread to someone you love. Wait til it cools, then wrap in in plastic wrap. Then put it in a old citrus/ apple mesh bag. Tie the ends with pretty ribbon and you have a wonderful gift and you didn't spend a lot of money. Those mesh bags are also great for smoothie gifts and assorted other ideas - like homemade pot scrubbers. How do you repurpose them?
Photobucket

October 21, 2012

Fall Fun: Tons of Ideas and Recipes


I have this love affair with fall. It's when I seem to really start cooking again. I mean, it's not as if I'm not cooking during the summer. My family is not starving to death if you were worried.


It's just I don't LOVE cooking in the summer. It's too hot in Georgia. Truth be told, it would probably still be too hot for me in Maine, but whatever.

Fall, on the other hand, begs for cooking. The amazing apples, sweet potatoes, squashes like butternut and pumpkin. All of them are glorious!! It's a joy to pull out the food processor, and hand blender to make soups and homemade apple sauce.

As I was reminiscencing and thinking of some fall recipes I really wanted to make, I thought I'd share some from the past....


Chocolate Acorn Treats


Mummy Dogs


Rice Cake Eyes and Apple Teeth (I know this photo is TERRIBLE. Thankfully I've learned a few photography tips since then!!)


And of course, we can't forget the silly family costumes that have come in the past. This year it's another book. Stay tuned to see what we come up with!

Here are the scientist and four seasons.

http://fromchapelhilltochickenville.blogspot.com/2011/11/christian-scientists-halloween-costumes.html
http://fromchapelhilltochickenville.blogspot.com/2010/10/happy-halloween-from-four-seasons.html

This one seems to be the online favorite.


The Three Little Pigs


Butternut Squash Wedges


Apple Pie Soup


Pumpkin Lattes and Pumpkin Chocolate Chip Pancakes


Creamy Spiced Pumpkin Soup


Hot Chocolate Cake


Crockpot Apple Butter

Happy Fall and Happy Cooking!!
Photobucket

September 17, 2012

Eggplant, Roasted Tomato, Polenta Stacks


When this month's Secret Recipe Club assignment arrived, I went straight to the blog of A Couple in the Kitchen. I was jealous you see. 

Oh, how I wish I could be part of "a couple in the kitchen". I wish my wonderful husband cared just a little about cooking, but that is just, not how he rolls. I mean, he REALLY enjoys the eating, and definitely helps with the cleaning, but he is never gonna join me in the cooking. It's just not his deal. With all of his other wonderful MacGuyver traits, I suppose that is okay. I guess I've come to terms with it. 

It's just, when I read the title of my new friends Amy and Chris's blog, I couldn't help but be a little jealous. I wanna be a couple in the kitchen...waaah. I know, I know. You are saying, "get over it Aimee"!

After I looked through Chris and Amy's blog, I came upon Slow Roasted Tomatoes and I knew this was the recipe I wanted to make. We have tomatoes coming out our ears. I canned some, sliced some for sandwiches, eat some right from the bush, gave away some, and even tossed a few rotten ones to the Girls in their coop. (Yes, until recently, they were still trapped in their coop so they didn't eat my hard work.) Roasting some tomatoes and storing them in oil, seemed like a perfect way to prolong our season.

Once I had some roasted lovelies, I had to think what to do with them. I froze several half pints for presents later in the year. Hee hee, I'm getting ready for Christmas already and I love it! I served some with my Roasted Chicken and saved some for Eggplant, Tomato, Polenta Stacks.

This easy vegetarian dinner was a product of what was laying around....lots and lots of Japanese eggplants! My one bush has given us a ton of these purple beauties. This dinner was fabulous!!! Course, if you don't have any eggplant laying around, you could always substitute zucchini for the eggplant or make orzo (small rice shaped pasta) dish also from A Couple in the Kitchen.

Eggplant, Roasted Tomato and Polenta Stacks

Ingredients
1 lg Japanese eggplant (or zucchini can be used)
salt and pepper to taste
3 c water
1 c polenta
1/4 c butter
1/2 tsp salt
olive oil
roasted tomatoes
1/4 c greek yogurt
2 tsp honey
chopped nuts for garnish (I just used an assortment we had from the pantry)

Slice eggplant into thin disks. Lay on paper towels and sprinkle with salt. Leave for 15 minutes or so.

Bring water to a boil in saucepan, add salt. Slowly add polenta and whisk into water. Reduce heat to low and cook for 5 minutes. Add butter and stir until melted and polenta is thick. Pour into a greased pan or bowl. Set aside.

Rinse eggplant with water and pat dry with paper towels. Heat a little olive oil in a saute pan or skillet. When hot, carefully put eggplant slices in pan and cook for a 1-2 minutes. Flip and cook another minute until golden brown. Cook in small batches until all the eggplant is done.

Mix honey and yogurt in a small dish.

Slice polenta into squares like you would brownies. Put a slice of polenta on each plate and then stack the eggplant on top. Sprinkle with roasted tomatoes. Add a dollop of yogurt and sprinkle with chopped nuts. Serve.


Roasted Tomatoes

Ingredients:
4 cups cherry or grape tomatoes, halved
2 tablespoons fresh basil, chiffonade (which is a fancy way of saying slice small strips)
2 tablespoons olive oil
kosher salt
freshly ground black pepper
4 cloves garlic
1/4 to 1/2 cup olive oil for storage
Preheat oven to 200 F. In a large bowl, place the halved tomatoes and basil. Drizzle with olive oil and season with salt and pepper to taste. Gently mix well with your hands. Line baking sheets with silicone baking mats (you know how I love these). Then line sheets with tomatoes in one layer, place garlic cloves in different areas on the baking sheet. Bake for 2-3 hours, until tomatoes look mostly dry. If storing, place them in canning jars, packing them in well and using a metal knife, get the air bubbles out. Cover completely with olive oil and seal with airtight lid. Store in refrigerator for up to six weeks or freezer for several months.

August 26, 2012

Carrot Orange Muffins


We are back from vacation and settled into the routine of school. For the first time ever we have an actual schoolroom to have our homeschool class. We ended up bunking the boys together and the girls together and that gave us an extra bedroom to finally dedicate to homeschooling. It's wonderful to finally have all of our books, supplies, art stuff and science kits all in one place!! Before, we forever carting things around the house and trying to keep the baby from getting into them. There have been plenty of times when scribble magically appeared on someone's workbook. That baby is so smart, she can already operate my cell phone and the dvd player!

Back to school or back to homeschooling, however you roll in your house, you are gonna need to eat. These are the BEST snack, breakfast or lunchbox muffins going. My kids loved them and I'm sure yours will too. They have lots of good stuff in them including nuts for protein. I used pecans, but you could use walnuts, cashews, whatever you like. 

These freeze well. Do what I do and wrap each one a plastic wrap and then throw them all in a freezer bag. When you need one, just pull it out. They thaw very quickly and it's such a timesaver!

Carrot Orange Muffins

Ingredients
1 c flour
1/2 c brown sugar
1/3 c grated carrots
3/4 c oats
1/2 tsp cinnamon
1 c buttermilk
3 tbsp butter, melted
2 tsp baking powder
1/2 tsp baking soda
2 oz roasted nuts, chopped
1/2 c dried apricots, chopped finely
1 tbsp poppy seeds
1 lg orange, zest and juice
1 egg
1/8 tsp salt
1/3 c granola cereal

Preheat the oven to 400 degrees.

Mix the flour, baking powder, soda, cinnamon, salt and sugar in a large bowl. Add nuts, carrot, apricots, poppy seeds, oats and orange zest. Mix well.

In a medium sized bowl, mix buttermilk, egg, melted butter, and orange juice. Pour this wet mixture into the dry mixture bowl and stir together lightly with a spoon. Leave lumps. Lumps are good when making muffins or quick (non-yeast) breads.

Spoon mixture into greased or lined muffin pan. Bake for 15 minutes.
Photobucket

August 21, 2012

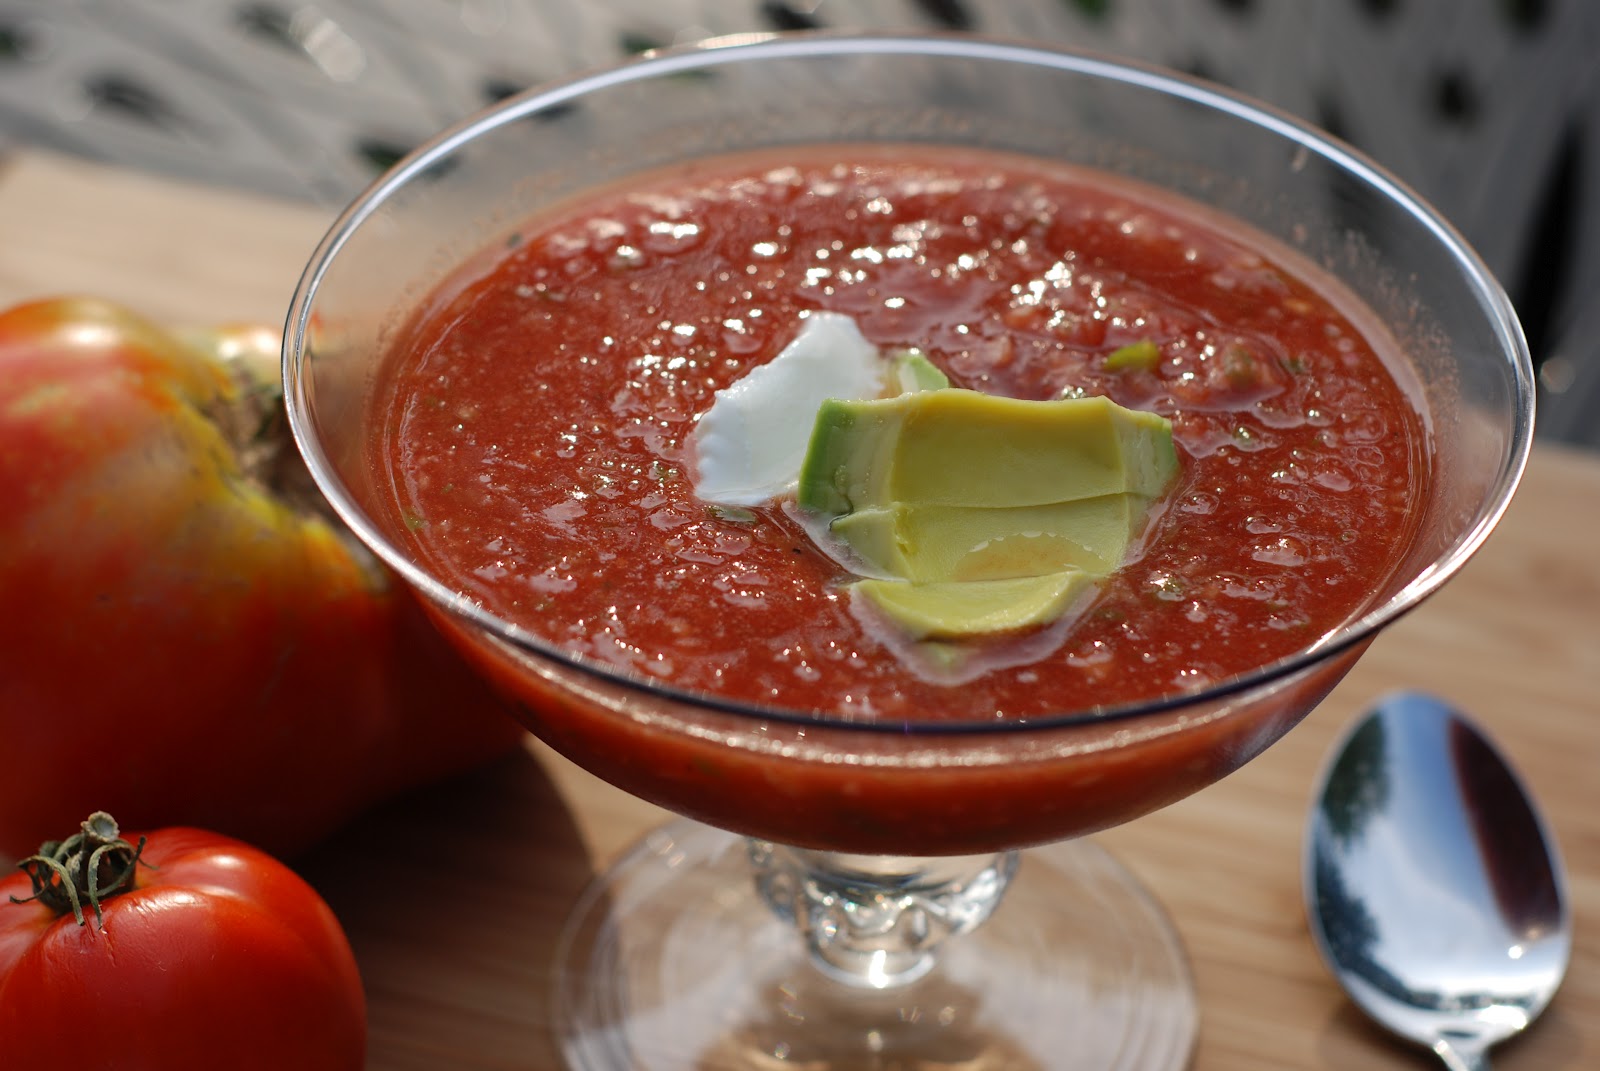
Gazpacho - Cold Tomato Soup


It's the end of summer and I love this time of year. For me, it's the change in seasons that I adore. When winter ends and spring begins I feel alive and joyful. When summer warmth comes I am ready to run around in flip flops and tank tops. I have to say, I really think fall is my favorite. Warm days with crisp nights. We get out the marshmallows and drag branches to the fire pit for smores bonfires with friends. We go camping and hang out watching the starts. Fall is bliss.

I've worked all summer long, in the garden and the harvest is paying off, but these days my garden is winding down. The beans are finished, the squash kaput, the peppers producing less each day. Today we pulled up two dead tomato plants, but at least the other are still going. We have different varieties of tomatoes planted. Last year I introduced the mini orange ones and they were amazing. This year, my new plants were Cherokee Purple and Mr. Stripey heirloom. Both had interesting color, but tasted not as bold as the traditional Better Boy that is our mainstay. They were also not as pest resistant. In fact, I'm pretty sure more bugs enjoyed my Mr. Stripey than I did! 

Better Boy, Purple Cherokee, Mr. Stripey all ready for soup
I did can (that soooo should be "jar") some of these tomatoes, which I will share with you tomorrow. It was pretty easy considering I usually only can jam. The canning jars look beautiful with the different color tomatoes in them.

Today however, I wanted to enjoy the end of summer. Today I made gazpacho. I have to say, I've never...ever had gazpacho. I'm sure it wasn't for lack of it being offered. My Mom loves the stuff, so I know she tried to get me to like it. I always declined. As usual, my Mom was right, I should have come around much sooner than this.

I'm pretty sure it was the name that put me off. It sounds so...so....tough. Like it might grow hair on your chest tough. Like take your lunch money away tough. Gestapo tough. I was intimidated. But as I've said before with souffle - wusiness needs to be confronted. I had to make this stuff. I'm proud to say...

I...have..conquered...gazpacho!!! And I actually liked it.

Of course, now that means I want you to conquer gazpacho as well (or at least be able to spell it). You may be an old pro at it like my Mom, or you may be a wussy newbie like me, but if you like fresh tomatoes, you are going to love this recipe. All you need is a food processor - no cooking involved. That's my kinda summer cooking.

Gazpacho
from Southern Living

8 tomatoes, peeled and chopped (I used several types of tomatoes, just be sure they are flavorful and ripe)
2 cucumbers, peeled and seeded
1 large bell pepper
1 small red onion, peeled
1 jalapeno pepper, seeded
1 large clove garlic
1- 32 oz bottle of tomato or vegetable juice
1 lemon, need 1 tbsp zest, 1/4 c juice
1/3 c red wine vinegar
2 dashes of hot sauce
3 tsp salt
1 tsp pepper
1 tsp paprika
sour cream
avocado

Cut tomatoes, cucumbers, pepper, and onion into quarters. Put all the chopped vegetables, the jalapeno and the garlic into the food processor. Pulse until chunky (or you can keep going til it's smooth if you don't like texture in your soup), scraping the sides when necessary. Pour into a large plastic container and add the rest of the ingredients. Stir, cover and put in the fridge for at least 8 hours or overnight.

Serve with sour cream and a sliced avocado. 

If the Tomato Peach Salad is summer on a fork, this is summer on a spoon! Thanks Mom for having patience and letting me grow into my taste buds.
 
Photobucket

August 1, 2012

Tropical Pink Dragonfruit Limeade


I've discovered a tropical paradise here in South Florida....Robert Is Here produce stand. Robert has one of those fun stories that I love sharing with my kids, stories of personal achievement. As Robert told me himself, it's a lesson on hard work, honesty and integrity. 
Robert and I talked...a lot!
Robert started his business at the tender age of six years old. He set up on a road to sell his father's cucumbers with a giant sign that said "Robert Is Here" and the name stuck, so the place is still called Robert Is Here. He soon progressed into hiring his neighbor to work for him when he was at school. Today, many years later, his business is still thriving with many friendly employees, loads of exotic fruits, fresh vegetables, and the MOST amazing milkshakes!! We came for the key lime milkshake, which was a perfect blend of sweet and tart - delicious, but we loved the mamey and the guanabana flavored milkshakes just as much, if not more. They were made with fresh fruit and they were delicious, creamy and vanilla with the fruit taste too - seriously good stuff. 
Sharing a mamey milkshake
We stopped at Robert's on our way to Key Largo, the northern most key and had such a delightful time, we stopped at Robert's again on the way home. We stocked up on avocados (and made guacamole three times while on vacay), the most delicious juicy Kitt mangoes that the staff was happy to slice up for us. They were so perfectly ripe that the juice dripped down our arms while eating them.
juicy mango!
We enjoyed longans (like lychee), key limes, jack fruit, tomatoes, and intriguingly named dragon fruit. 
Source: Tropical Fruit Nursery
Dragon fruit is strange looking from the outside, but the variety we had was beautiful fuchsia pink with small black seeds on the inside. I cut it in half and just scooped the fruit out with a spoon, much like an avocado.

Look at this beauty...

With this color, I knew I wanted to make something fresh to show it off. I figured it would make a beauitful drink and boy was I right. We had some limeade concentrate in the freezer which I mixed up and added the chopped dragon fruit. When stirred up, it all became this gorgeous pink color. It didn't change the flavor of the drink because the dragon fruit flavor is so mild, something like strawberries. I think this fruit would make an incredible mixed drink with natural coloring.

Tropical Pink Dragonfruit Limeade
1 can limeade concentrate
1/2 dragonfruit

Mix up limeade with water and stir in chopped dragonfruit. Let sit in fridge for at least 30 minutes to overnight. The color will deepen over time. Add tequila for an adult dragon-rita.
 
We tried it in orange juice too and it created a beautiful translucent coral color. A a little of the fruit goes a long way in coloring a drink so I had plenty of fruit to make different drinks.

Next time you are having a party and need a punch or fun drink to make, give dragon fruit a look. You won't be disappointed with this kinda color!!


Photobucket

June 28, 2012

Chicken Feta Soft Tacos - Fast Weeknight Dinner


You know I avoid the kitchen most all summer long. I just don't love being in there where it is hot. I get all whiny and complaining, kinda like my kids and it isn't pretty. I LOVE cooking on the grill in summer. I mean it's already hot outside, so cooking out there doesn't change much. It's already 92 in the shade.

Actually, I guess I should say, I love getting my HUSBAND to grill. I do all the prep work and then he stands out there sweating and feeling very manly. Works out great for everyone involved.

This recipe was born of leftover grilled chicken. I often have the Grillmaster cook a couple of extra pieces of chicken to have for salads the next day. This night, I needed fast and had the extra chicken already done, but it's really fast even when starting from nothing. I just happen to have these ingredients in the fridge, so I set them all out. Thankfully it came together beautifully. Really, simple, delicious, fresh...exactly what summer is all about.

Chicken Feta Soft Tacos
chicken breasts
feta cheese
cilantro
cabbage (or lettuce)
limes
pumpkin seeds, roasted and salted
sour cream
tortillas

Drizzle some olive oil over the chicken and sprinkle with some salt and pepper (oregano is good too if you have it). Make sure the chicken is at room temperature before putting on the grill. Grill with indirect heat on medium for about 10-15 minutes until the juices run clear. After the chicken comes off the grill, let it rest for 10 minutes and then chop it into small pieces. Serve all the ingredients in a divided chip tray (like Help Yourself Oatmeal) with warmed tortillas. Let everyone custom make with their choices. My kids especially love the pumpkin seeds, so pick these up next time and keep in the pantry. Summer is served!

 
Photobucket

May 27, 2012

Pickled Pink Onions


While I was browsing the most recent blog I was assigned for Secret Recipe Club, when I made the Spring Green Risotto, I found these beauties - Pickled Onions. Not something I had ever eaten plain or made, but intriguing and oh, so simple. Kate at a Spoonful of Thyme had whipped them up to use with her tacos and fresh made salsa, but I had another idea in mind. They just seemed the perfect little topping for deviled party eggs. {When our kids asked why they were named deviled egg, I couldn't explain, so we adopted my Aunt's name for them...party eggs. Much more descriptive I think.}

I pickled an entire purple onion, so I had plenty to go around. Some of them, I served when we had friends over for barbecue. We put them on our barbecue sandwiches, instead of the traditional pickles like I normally do. I use a slow cooker recipe that has a can of Coke in it, because I DO live in Atlanta. I will share this recipe with you next week, but here's the photo (with traditional pickles).


Anyway, after the cookout and smore's roasting, there were plenty of the lovely pickled onions left over, so I came up with the party egg idea. Notice how one of them looks like the pink breast cancer ribbon??!!  How cool is that? I'm thinking fund raising party for anyone walking to raise money.


The last few of the onions got chopped up and tossed in my favorite broccoli salad. The one with mayo, red wine vinegar and Parmesan cheese? I could eat that salad almost everyday, even without the bacon. On your next barbecue or party, whip these beauties up and see what you can use them for. I'd love to hear what you come up with.

Pickled Pink Onions

Ingredients
1 med red (purple) onion
1/4 c apple cider vinegar
1 tsp sugar
2 tsp salt

Thinly slice the onion. Mix the vinegar, sugar and salt in a bowl. Add the onion slices and let sit in fridge for at least 30 minutes. Will keep for 2 days in fridge.

In hindsight, I'm guessing you could use the pink salt liquid that is created for pretty pink pickled eggs!


Photobucket

May 23, 2012

Spectacular Strawberry Angel Food Cake

Do you have some of these laying around? We have been eating strawberries almost everyday and I still don't get tired of them. We most often eat them plain or with breakfast, but I do make this Fresh Strawberry Cake, and this Strawberry Vinaigrette from my friend Chris. I love to take the kids strawberry picking because those seem to be the most delicious. This year, we planted strawberries and we've had a few small ones. Hopefully next year we will have a better crop.
This simple cake looks spectacular, but it's really easy. Bake or buy an angel food cake. I used an angel food Betty Crocker mix for this one. After the cake has cooled, split it in the middle. Fill the middle with cream and macerated strawberries and then put the top back on. Add more cream on top and decorate with whole strawberries. Delicious!


Whipped Cream Delight
1 pt whipping cream
1/4 c powdered sugar
3 oz mascarpone cheese or cream cheese, softened
Put the whipping cream in a mixer with wire attachment. Beat on higher until it seems to be getting thicker. Add powdered sugar and beat until it forms soft peaks. Stir in the softened cheese.

Macerated Strawberries
1 pt strawberries
4 tbsp sugar
Slice all but four or five strawberries into a bowl. Add the sugar and stir. Keep in fridge and stir occasionally. This can be made the morning or afternoon of when you want to serve the cake. The berries will create a wonderful syrup that you can pour into the bottom half of the cake.

Photobucket

May 21, 2012

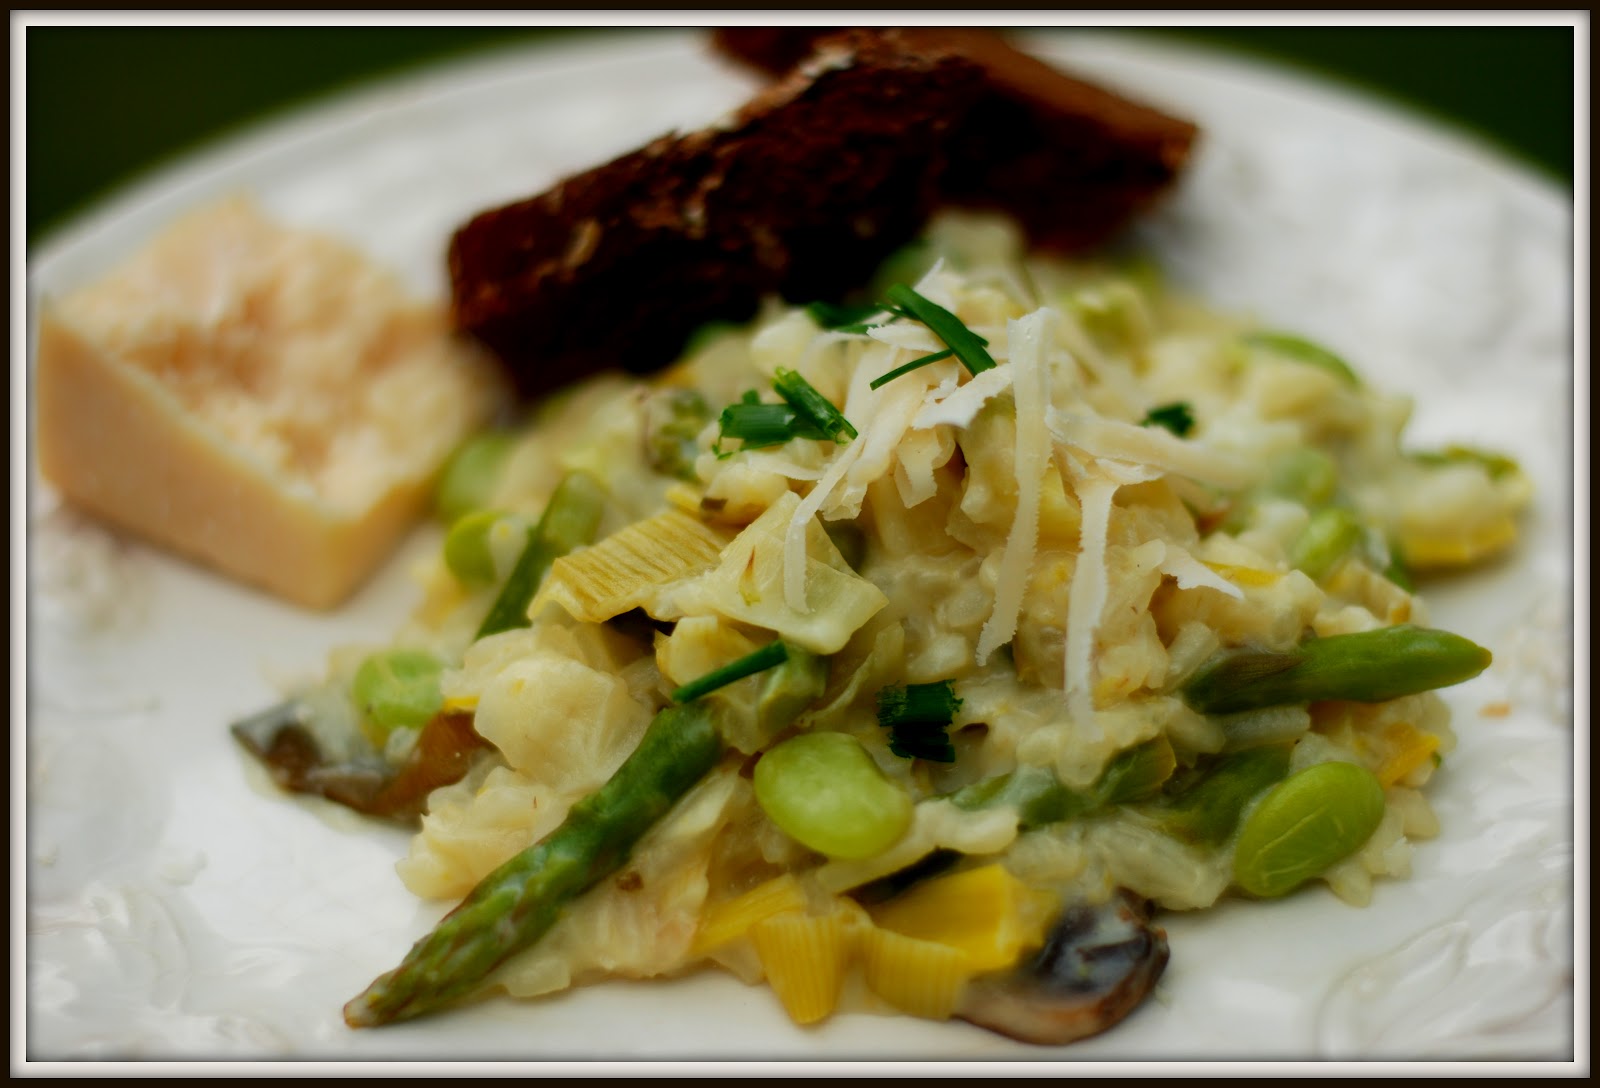
Creamy Spring Green Risotto

Secret Recipe Club time! It's funny how you start to know many of the foodies in the Club as you participate month after month. When I got my assignment, I already "knew" Kate and her blog, A Spoonful of Thyme. I had tried to eat my way through the computer screen with her Pulled Pork Sandwich. Her husband has the most awesome looking smoker! Serious man grilling.

I eventually chose Kate's Spring Green Risotto since it's fresh and uses all the of the spring veggies I love like peas and asparagus. We eat asparagus all the time. My favorite way is tossed with a little olive oil, salt and pepper and thrown on the grilled for a few moments. The kids are big fans of the little charred bits that happen.

I adore risotto and normally serve it during the colder months. But Kate proved to me risotto could be a warm weather dish with the addition of fresh green veggies. It turned out delicious! My husband declared it restaurant quality and we agreed it should be "on the rotation" just like Kate said.

I made a few changes and rewrote the recipe because it seemed a little confusing to me and I thought it could read simpler. (I'm sure that had something to do with the fact that is a recipe from Ina Garten - just saying.) I did leave out the fennel, because it just didn't look good at the grocery store when I went. I added mushrooms because that's one of my favorite risotto ingredients and I added lima beans to up the protein. You could easily make this a vegetarian recipe by using veggie stock. It may seem like a lot, but it is just one dish and we made it our main meal. I added a couple of pieces of tilapia and some sweet pumpernickle bread and dinner was done.
Spring Green Risotto

Ingredients
1 lb asparagus
5 oz lima beans
1 1/2 tbsp olive oil
1 1/2 tbsp butter
3 c finely chopped leeks, white and light green parts (1 leek)
8 mushrooms, sliced 
1 1/2 c Arborio rice
2/3 c white wine
4-5 c chicken stock
5 oz frozen peas, defrosted
1 tsp pepper
2 lemons, zest and juice
1/3 c mascarpone cheese or cream cheese 
1/2 c grated Parmesan cheese 
3 tbsp chives, minced 

Bring a medium pot with a small amount of water (maybe 3 inches) to a boil. Put ice in a large bowl and add water to make an ice bath. Snap the tough ends off the asparagus and give to your very grateful chickens. Then cut the asparagus spears into 1 1/2-inch lengths (on the angle if you want to be fancy).  Put asparagus and lima beans in the boiling water for 3-4 minutes. Drain and plunge the veggies immediately in the bowl of ice water. Dry your pot over low heat to use for the next step. Drain the vegetables.
Heat the olive oil and butter in the dry pot over medium heat. Add the leeks and mushrooms, cook for 6 mins. Add the rice and stir for 3 more minutes. {There is a lot of stirring coming up, about 25 minutes of it, so if you can rope in a sous chef, this is the time. You really don't have to stir constantly, but you do need to stay with it. It's worth it - really.}

Add the white wine and simmer over low heat, stirring constantly, until most of the wine has been absorbed. Add the chicken stock, 1 cup at a time, stirring almost constantly and waiting for the stock to be absorbed before adding more. Immediately after adding the last cup of stock, add the asparagus, lima beans, peas, and pepper. Zest both lemons right into the pot.

Squeeze the lemon juice from both lemons into a small bowl, add the mascarpone. Whisk together with a fork.

After a total of about 25 minutes of cooking and stirring the risotto, all the liquid should be absorbed. Then you are ready for the next step. Turn off the heat and add the mascarpone-lemon mixture plus the Parmesan cheese and chives.

Serve with an additional garnish of Parmesan cheese and chives if you want to fancy it up.
Photobucket

LinkWithin

Related Posts Plugin for WordPress, Blogger...