Showing posts with label fruit. Show all posts

March 20, 2013

Beautiful Berry Cream-Filled Tart: My Favorite Dessert


This dessert seriously makes me swoon. It is my all time favorite dessert, ever since I was a teenager. I was that weird kid that was thrilled to see fruit in my lunch box (thanks Mom). I guess I have a special place in my heart for berries because they are so perishable and the season is pretty short. You gotta get 'em while the getting is good. Kinda like kisses from my kids - I'll take them whenever they are ripe for taking. Even the wet sloppy ones from the 2 year old!

The tart may look a little difficult because it's so showy (like the pavlova) but it's really not. Pull together the ingredients for the crust and press it into a pie pan or a tart pan (see below) and then make the creamy filling. After that, it's just a matter of piling on the berries!

Beautiful Berry Cream-Filled Tart

Ingredients
Pastry Shell
1 1/2 c flour
1/4 c sugar
1/8 tsp salt
8 tbsp cold butter, cut into small pieces
1 egg yolk, beaten with 2 tbsp heavy cream

Put flour, sugar and salt into a bowl of a food processor. Pulse to mix. Add the butter pieces and pulse. Add the egg/ cream and pulse until the dough is chunky and holds together when squeezed. (You can also do this in a bowl with a pastry cutter, it just takes more work.) Dump the dough onto was paper and chill in the fridge for 30 minutes. 

Roll dough out into the shape of your tart pan. This dough makes enough for a 9" round pan. (A tart pan has a bottom that comes apart from the sides like a cheesecake pan to make serving a cutting the tart easier. You just lift the bottom of the pan out of the sides and serve the tart on the bottom. You can use a pie pan, just serve it right out of the pan like a pie.) Fit the dough into the pan and cover it with foil or parchment paper. Put some pie weights or dried beans on top of the foil to keep it from puffing up and bake at 425 degrees for 5 minutes. Reduce oven temperature to 350 degrees, remove the weights, prick the bottom of the pastry with a fork. Bake 15-20 minutes, until golden. Cool on a wire rack.

Cream Filling
2/3 c sour cream
1 (8 oz) package cream cheese, softened
2 tbsp lemon juice
1/2 c sugar
1 tsp vanilla
1/4 c heavy cream
Beat sour cream, cream cheese, lemon juice, sugar, vanilla, and cream together in a large bowl. Spread mixture over cooled pastry shell. Arrange berries over the top and garnish with mint leaves if desired.

Chill between 1-4 hours before serving. This doesn't keep well in the fridge for more than a day, since the crust gets soggy.
 
Photobucket

February 15, 2013

Lemon Love Note Bars - Sweet and Sour


These bars are sweet and sour all at the same time

...kinda like marriage.

I love my husband. It's true, he's the man for me. He puts up with my moods and endless chatter. He brought me flowers and a huge balloon for Valentine's Day, and the man HATES balloons. He eats everything I put in front of him. He can build me anything I ask for. He's the most supportive and encouraging person I know. He's there for me whenever I need him. (Boy, oh boy, have I realized how much I need him lately.) We are a team and a great one at that. (I'm pretty sure we could win the Amazing Race.)

However, there are definitely times when we seem to treat each other more "sour" than sweet.

Everyone has some sour moments - right? At this point in our marriage (ten years) I'm pretty sure it's normal. I mean, you are not really supposed to get along with someone every single day right?

I logically knew it wouldn't all be roses before we got married. I even engraved it on the inside of his wedding band, "Come What May". And while I don't love being in the down times, I do love the wonderful tenderness that comes after we get out of the funk.

The sour, just makes the sweet all that much sweeter.

Honey, MacGuyver, Babe, Husband....this one is for you. I love you...come what may.

Lemon Love Notes

Ingredients
1 c butter
2 c flour
1/2 c powdered sugar
1 lemon, zested and juiced
4 eggs
2 c sugar
4 tbsp flour
1 tsp baking powder
1 1/2 c powered sugar
1 tsp vanilla
2 tbsp butter, melted and cooled
3 tsp milk

Blend butter flour and sugar together with pastry cutter or a fork. Pat into a 9x13" ungreased baking dish. Make sure this is very flat and even. Bake at 350 degrees for 15 minutes. Cool until you can touch the baking pan.

While that is baking and cooling, make the filling. Mix together zest of one lemon and the juice of the lemon with eggs, sugar, flour and baking powder. Pour this on the cooled crust and bake again at 350 degrees for 25 minutes. Cool again.

Melt butter. After the bars are cooled off enough you can touch the pan again, make the icing. In a small bowl, whisk together the sugar, vanilla, melted butter and milk. Pour over the top of the pan. Cut into small bars because these are super rich. They will keep fresh for only a few days.
Photobucket


February 9, 2013

Apple Carrot Slaw


I had some carrots in the fridge that needed a home and I just didn't feel like cooking them since the weather here in GA has been so warm. It's absolutely crazy... my daffodils are trying to come up. I have really missed winter this year. I know those of you up north think I'm crazy, since you are underneath a mound of snow.

Mom and Dad were flying back from Dad's chemo treatment yesterday and were delayed with all the flights being cancelled. I was a little worried about them, but they are home, safe and sound. Dad is exhausted, but hanging in there.

On the other side of the family, my father-in-law has moved into an independent living place so we are sleeping better around here, since we don't have to worry about him on the stairs. Thank you all for the kind words and prayers.

This recipe is perfectly refreshing with a roasted chicken and homemade wheat bread. I love the addition of celery seeds. I usually add those to our cabbage slaw because that's how MacGuyver's Mom makes slaw. I never thought to add them to a sweet slaw. 

I have the perfect imitation recipe for Chik-Fil-A's carrot slaw and this recipe somewhat reminded me of that, so I left the raisins out of the original recipe to make it different to my family. Let me know what you think.

Apple Carrot Slaw
Adapted from Feast on the Cheap, check out their beautiful photo and original recipe

3 crisp sweet-tart apples, cored and cut into matchstick-size strips
3 large carrots, washed, peeled and coarsely grated
2 tbsp sweet onion, minced
3 tbsp low-fat mayo
1/3 c cider vinegar
1 tbsp real maple syrup
1 tbsp celery seeds
Salt and pepper to taste
Whisk mayo, vinegar, celery seeds, maple syrup, salt and pepper in a medium bowl. Set aside. Prep the slaw ingredients and combine in a large bowl. Toss with the dressing, cover and refrigerate for 30 minutes before serving.  
Photobucket

January 5, 2013

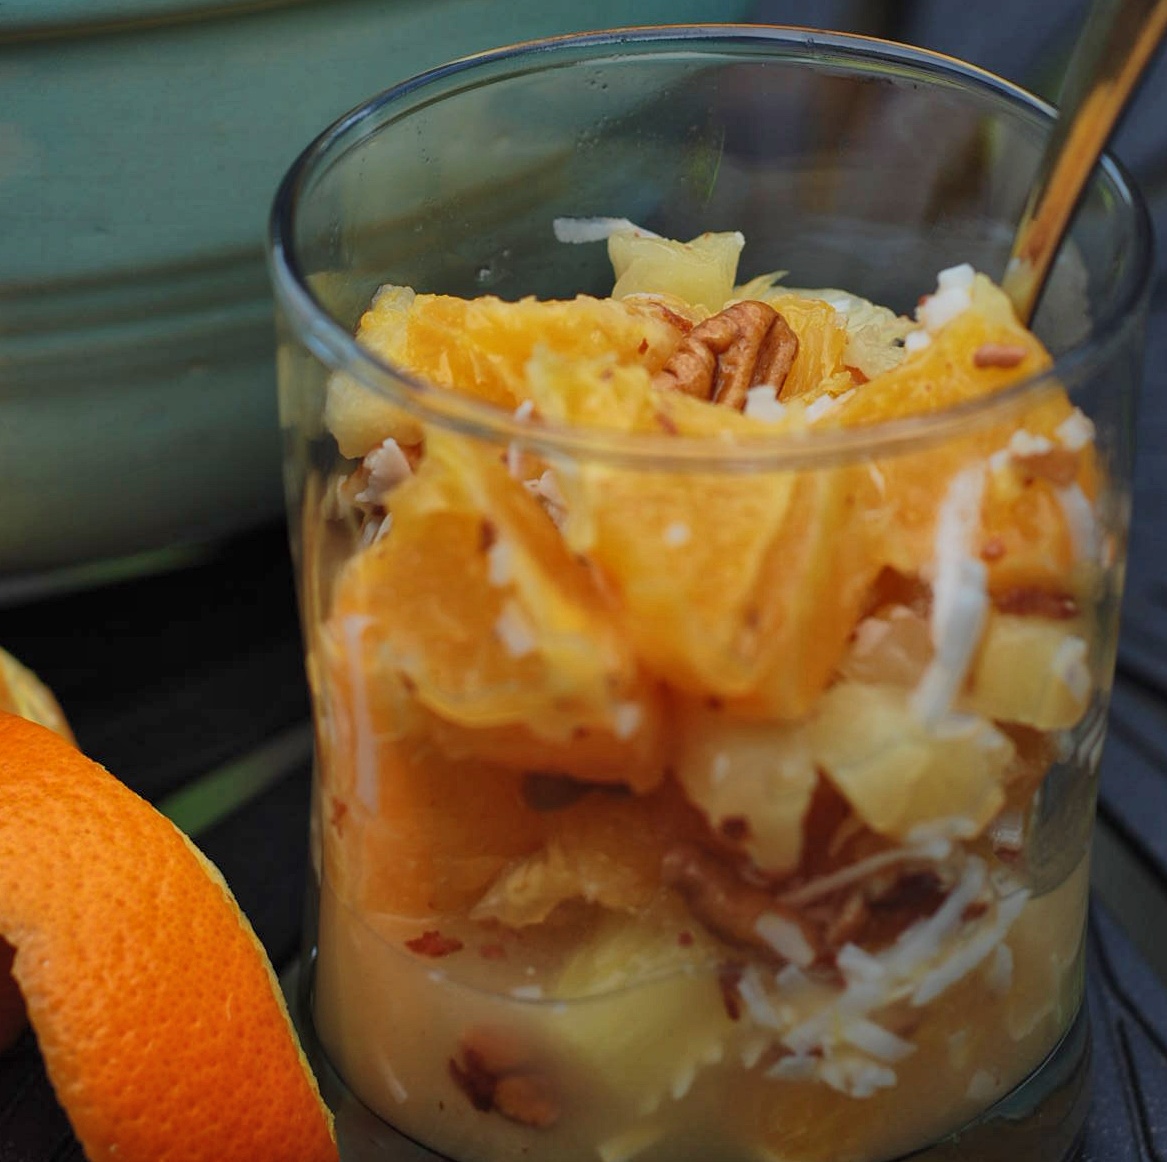
Ambrosia: Orange Pecan Salad


Ahh, the smell of a fresh new year! What a pleasure this time of year is for me. I love the quiet space after Christmas and before schooling gets in gear again. I have enjoyed laying around and doing...nothing.

And don't worry, my family is still eating, I just have not been posting. I've...been...lazy (gasp). Sometimes I have to take a break from routine or I think I will go crazy. The mundane of laundry, dishes, even getting dressed, just gets old to me every once in a while. I've been this way for as long as I can remember. Even when I was a teenager, life would just get "boring". It usually takes something fun and exciting to bring me back into motivated mode. At this moment in time, I have something REALLY exciting to look forward to!

I'm taking my two oldest kids to Disney World for the first time. I can't wait to see the magic of Disney through their eyes. I'm practically giddy with joy now that we are in the actual month of departure!! My husband jokes that the kids are along for MY vacation, not the other way around.

All the planning and waiting is finally coming to fruition and it's going to be great. Of course, there is one down side to Disney - the food. It's expensive and not delicious. Maybe I'm wrong, maybe things have changed since I was there 13 years ago, but I remember being glad I brought my own snacks. As I've mentioned, I can only handle so much junk food before I'd rather not eat. So part of my packing preparations are putting together healthy snacks and thinking about what we can eat quickly in the condo for breakfast or a late night snack.

Since we will be in the Citrus State, we will be enjoying grapefruits and oranges straight from the orchard. I plan on bringing bags home with us to share with the little kids and my husband (who are all staying home). This is one of our families favorite ways to enjoy citrus.

Ambrosia Salad

Ingredients

1/4 c pecans
6 oranges
1 grapefruit (optional)
1 can pineapple pieces (optional)
1/4 c sugar
1/4 c shredded coconut

Toast pecans in a dry skillet or toaster oven tray until they smell fragrant and lightly brown. Watch carefully so they don't burn). Let cool.

Slice the peel off the oranges, starting with the top and bottom. Then slice off the sides. When the pith (white part) is gone, slice knife in between each membrane and loosen the orange. Do this over a bowl to catch all the juices. Plop the segmented orange into the bowl. Repeat with grapefruit if you desire. Add pineapple to the bowl. Add sugar and stir. Add coconut. Chop the cooled pecans and add to the bowl. Give a good stir and then store in the fridge until you are ready to serve. Ah-maz-ing!


Photobucket


August 1, 2012

Tropical Pink Dragonfruit Limeade


I've discovered a tropical paradise here in South Florida....Robert Is Here produce stand. Robert has one of those fun stories that I love sharing with my kids, stories of personal achievement. As Robert told me himself, it's a lesson on hard work, honesty and integrity. 
Robert and I talked...a lot!
Robert started his business at the tender age of six years old. He set up on a road to sell his father's cucumbers with a giant sign that said "Robert Is Here" and the name stuck, so the place is still called Robert Is Here. He soon progressed into hiring his neighbor to work for him when he was at school. Today, many years later, his business is still thriving with many friendly employees, loads of exotic fruits, fresh vegetables, and the MOST amazing milkshakes!! We came for the key lime milkshake, which was a perfect blend of sweet and tart - delicious, but we loved the mamey and the guanabana flavored milkshakes just as much, if not more. They were made with fresh fruit and they were delicious, creamy and vanilla with the fruit taste too - seriously good stuff. 
Sharing a mamey milkshake
We stopped at Robert's on our way to Key Largo, the northern most key and had such a delightful time, we stopped at Robert's again on the way home. We stocked up on avocados (and made guacamole three times while on vacay), the most delicious juicy Kitt mangoes that the staff was happy to slice up for us. They were so perfectly ripe that the juice dripped down our arms while eating them.
juicy mango!
We enjoyed longans (like lychee), key limes, jack fruit, tomatoes, and intriguingly named dragon fruit. 
Source: Tropical Fruit Nursery
Dragon fruit is strange looking from the outside, but the variety we had was beautiful fuchsia pink with small black seeds on the inside. I cut it in half and just scooped the fruit out with a spoon, much like an avocado.

Look at this beauty...

With this color, I knew I wanted to make something fresh to show it off. I figured it would make a beauitful drink and boy was I right. We had some limeade concentrate in the freezer which I mixed up and added the chopped dragon fruit. When stirred up, it all became this gorgeous pink color. It didn't change the flavor of the drink because the dragon fruit flavor is so mild, something like strawberries. I think this fruit would make an incredible mixed drink with natural coloring.

Tropical Pink Dragonfruit Limeade
1 can limeade concentrate
1/2 dragonfruit

Mix up limeade with water and stir in chopped dragonfruit. Let sit in fridge for at least 30 minutes to overnight. The color will deepen over time. Add tequila for an adult dragon-rita.
 
We tried it in orange juice too and it created a beautiful translucent coral color. A a little of the fruit goes a long way in coloring a drink so I had plenty of fruit to make different drinks.

Next time you are having a party and need a punch or fun drink to make, give dragon fruit a look. You won't be disappointed with this kinda color!!


Photobucket

July 23, 2012

Brown Butter Glazed Pineapple with Vanilla Bean Icecream

Ahh, palm trees, ocean breezes, crabs, and snorkeling...you guessed it, I'm not in Georgia anymore! We are visiting relatives in sunny, steamy, south Florida. That's right -- at precisely the time of year when most people are fleeing the summer heat of the tropics, we're enjoying the quiet beaches and light traffic of Florida in the summertime. My kids are totally grooving on the screened in pool in the backyard, as well a diverse selection of Florida critters including lizards, snails, land crabs, cicadas and manatees. OK, it may not be everyone's idea of heaven, but we adore the beach in all types of conditions, and when you have a free place to stay that's (literally) right around the corner from the beach it makes us want to stay for a LONG time! And by offering to cook in exchange for a place to stay, I get the best of both worlds: wonderful food AND the beach!   

Since it's Secret Recipe Club time, I was hoping to find the perfect tropical desert. For our main menu, I made these fresh amazing chicken feta tacos (which I actually made into fish feta tacos this go round since we're, duh, at the ocean). I was hoping for something fresh & fruity, something light, something that tasted like.... well, Florida! And then, as I was searching through Cairns Manor, I came across the perfect dessert for the occasion:  Brown Butter and Rum Glazed Pineapple.

Fresh, fruity, tropical and delish -- what's not to love? Off we went to the store to get pineapple and few hundred other things I'll need on this trip. Along the way I made some adjustments to Jo's recipe, removing the rum and adding some extra spices, including salt and pepper because sweet and salty always go together. The end result was delicious with a great blend of tastes and textures and warm pineapple pairing nicely with ice cream.  

Before I get into this yummy recipe, a quick side note to introduce: Jo over at Cairns Manor: Jo is a Midwife, and people like her hold a special place in my heart because I could never do her job. I'm a real medical wimp and I stand in awe of those in the industry. My Mom was a Nurse  and actually is still involved in the medical field as a consultant. Jo and my Mom are heroes. I'm so glad God did not create us all alike, because wimps like me could never give anyone a shot!! Thank you Jo for all you do.

On Jo's blog, she made this pineapple dessert and served it with angel food cake. I decided on pound cake AND ice cream. Really good Breyer's Vanilla Bean ice cream. It was delicious. Everyone asked for seconds. The pineapple glaze ran over the cake. The heat of the pineapple melted the ice cream a little and they all mixed together for sweet, salty, tangy perfection. Go out and buy a pineapple, make this poundcake and serve this dessert tonight. If you don't want to heat up your kitchen, grill the pineapple. Ah-may-zing!


Brown Butter Glazed Pineapple
1 pineapple
1/2 c butter, unsalted
1/2 c packed brown sugar
1/2 tsp ground cinnamon
1/4 tsp ground cloves
1/8 tsp grated nutmeg
1/2 tsp salt
1/4 tsp pepper

Cut top and bottom off the pineapple. Following the curve of the pineapple and cut off the skin. Cut pineapple in half from top to bottom. Cut again in quarters. Now the core can easily be cut out by cutting off the point of the quartered pineapple. Cut into 1/2 inch slices and set aside.

Melt butter in a large skillet over medium high heat. Once melted allow to continue to cook until it foams up, the foam subsides and the butter starts to brown, then let it cook to your desired browness. Just be very careful not to let it burn! Add in the brown sugar and spices. Cook until slightly thickened, about 1 minute.

Add the pineapple to the pan. Lower heat to medium low. Cook until deep golden, about 8 minutes. Transfer the pineapple to a bowl, leaving as much glaze as you can in the skillet.

Return the pan with glaze to medium-high heat. Simmer until again thickened, about 3-4 minutes.

Grilling option: melt butter in microwave. Mix butter, sugar and spices in a large bowl. Toss with pineapple to coat. Grill pineapple over med direct heat for 5 minutes until warm with lovely grill marks.

Serve immediately with ice cream and pound cake if you dare.

Photobucket

May 23, 2012

Spectacular Strawberry Angel Food Cake

Do you have some of these laying around? We have been eating strawberries almost everyday and I still don't get tired of them. We most often eat them plain or with breakfast, but I do make this Fresh Strawberry Cake, and this Strawberry Vinaigrette from my friend Chris. I love to take the kids strawberry picking because those seem to be the most delicious. This year, we planted strawberries and we've had a few small ones. Hopefully next year we will have a better crop.
This simple cake looks spectacular, but it's really easy. Bake or buy an angel food cake. I used an angel food Betty Crocker mix for this one. After the cake has cooled, split it in the middle. Fill the middle with cream and macerated strawberries and then put the top back on. Add more cream on top and decorate with whole strawberries. Delicious!


Whipped Cream Delight
1 pt whipping cream
1/4 c powdered sugar
3 oz mascarpone cheese or cream cheese, softened
Put the whipping cream in a mixer with wire attachment. Beat on higher until it seems to be getting thicker. Add powdered sugar and beat until it forms soft peaks. Stir in the softened cheese.

Macerated Strawberries
1 pt strawberries
4 tbsp sugar
Slice all but four or five strawberries into a bowl. Add the sugar and stir. Keep in fridge and stir occasionally. This can be made the morning or afternoon of when you want to serve the cake. The berries will create a wonderful syrup that you can pour into the bottom half of the cake.

Photobucket

May 3, 2012

Kiwi Kale Smoothie

 
I have a confession to make, I've never tried a green smoothie, until now. Something about greens shredded up in a blender, just did NOT sound delicious to me. I love salads and adore my seaweed wrapped sushi, but mixed up with my favorite fruits...nah, I would always pass. It was way too Dr. Seuss- like. "I do not like green eggs and ham Sam-I-Am."

Last week, when my sweet friend Amy passed along some kale with that kohlrabi I figured I would saute it up like I normally do with greens like swiss chard or make these kale chips like I've done in the past.. But something on that stinkin Pinterest caught my eye (yes, I have an addiction and the boards to prove it). Those crazy green smoothies. They looked, well... yummy.  How bad could it be if so many people drank them? I had the kale and it was hot outside. Which at our house means I should be making smoothies or doling out popsicles. I figured if it was terrible tasting, I could always foist it off to the baby, because she'll eat/ drink just about anything. So I threw caution to the wind and made my first green smoothie!

I had a big bag of kiwi's from Aldi in the fridge. Hey, they are green and they would disguise the greenness of the kale. I had some apple juice and frozen bananas to sweeten it because adding my normal yogurt/ milk didn't seem right with vegetables.

Turns out this concoction was delicious, which probably most of you already know. I'm sure I'm the last green smoothie holdout, right? (It's like texting, I'm slow on the bandwagon, but I'm on now.)

This thing was REALLY tasty. Everyone liked it and asked for seconds. The baby finished hers first and was going around trying to steal from the others. So here's my endorsement, if you've never tried it, you might just like green smoothies....and ham, Sam-I-Am. Now please excuse me, I headed out to buy some kale.
Kiwi Kale Smoothie
8 leaves kale
1 c water
2 bananas, frozen is better but not necessary
3 kiwi, peeled
1 c apple juice
ice

Strip the kale off the stem just like you do with flowers. Hold the stem with one hand and pinch it with the other and pull up until the leaves slide off the stem. (Need a step-by-step of what I'm talking about?)

Stuff the kale into a blender. Add water. Blend until you have a very green smooth pulp. Add the banana, kiwi and apple juice. Blend again until smooth. Now top off your blender with the ice and whirl until you have a frosty smoothie. Serve immediately with straws for fun. :)


Photobucket

September 29, 2011

Apple Pie Soup


Yea!!! Apples are here. We took the kids apple picking up in Ellijay (Georgia's apple capital) and had another wonderful time. We go to R & A Orchards owned by Richard and Ann, who still drive the tractor and hand out the picking bags. They are a caring couple who's kids and grandkids can be found out in the orchard working with them. I love seeing a family business succeed, so I'm happy to support them.
Their apples are priced very reasonably and taste waaay better than store bought. We picked two pecks and bought another peck that was filled with seconds (smaller apples I used for apple sauce, apple butter, and apple muffins). Can you tell we REALLY like apples around our house? I had trouble getting the kids to let me cook with them because they just wanted to eat them straight out. My husband loves them best like this.

Apple Pie Soup is a recipe worth the small effort. It's delicious! It comes from a combination of a recipe I learned at the Whole Foods Cooking School, where I volunteer, and a recipe out of the Palmetto Palate Cookbook. Both of those recipes serve this as a chilled soup but I really like it warm. When it's warm it reminds me of apple pie...delicious! Serve it however you like, no matter, you and your kids are going to love this one.


Apple Pie Soup

12 apples, peeled and sliced or chopped
3 c apple juice or cider
3/4 c sugar
1 cinnamon stick (or you can use 1 tbsp ground cinnamon)
1 tsp ground ginger
1 tsp vanilla
2 c half and half

Cook apples with juice, sugar, cinnamon and ginger in pot. Bring it to a boil with the lid on, then turn down the heat and remove the lid, let it simmer for 20 minutes. Stir occasionally and break up the apples as they get mushy. Take out the cinnamon stick if you used it and add the vanilla extract. Puree the soup in a blender or with an immersion blender (my personal favorite kitchen tool). Where you go from here is your choice. Put back in your pot or chill in fridge. If you want to serve this warm, you add the half and half slowly bringing the soup back up to a warm temperature. If cold wait until the base is well chilled and then when you are ready to serve, add the half and half and mix well. Serve in bowls with a few slices of apple and some cinnamon sprinkled over the top as a garnish.


I finally broke down and got an apple peeler this year and now all I'm thinking is, "what took me so long"? These things are great! It makes fast work of getting an apple peeled, cored and sliced and the kids can even do it with me.

Photobucket

February 23, 2011

Peanut Butter, Apple and Bacon Sandwiches

The first time I saw this recipe, I was not to sure. I mean, it sounds like something Elvis would eat. But I was a little intrigued and I like to try new things. I also like to get my kids out of their pb and j rut every once in a while. Ever add bananas, cinnamon, apples, or shredded carrots to their normal pbandj? Sometimes we eat them on bagels, raisin bread, Hawaiian rolls, pita, or even rice cakes. So, in our house, unusual is good and celebrated. But this sandwich was strange even by our standards (someday I'll share the craziest sandwich recipe of all with you. We use it to haze and thereby induct in-laws into our family).

Anyway, I made this delicious sandwich one day and we all loved it! Well not the hubby, he thought it was a little too far fetched for his taste. I think I liked it because it was creamy with the peanut butter, crunchy with the apples, and salty with the bacon. I culinary trifecta! Try it for your next lunch - I dare you.

PB, Apple and Bacon Sandwiches

margarine
wheat bread
peanut butter
tart crisp apples, thinly sliced
cooked bacon, preferably applewood smoked
dash of cayenne pepper (optional)
lettuce

I like to cook my grilled sandwiches in my cast iron skillet, but whatever pan you start with, heat it up. The rule in the pro kitchen is.. "the pan waits on you, you never wait on the pan". So put your skillet on a med heat.

Spread peanut butter on one slice of bread. Sprinkle a little of the cayenne pepper on if you want some heat. Layer the bacon strips on top. Close the sandwich together and spread the top with some margarine. Place in the skillet, buttered side down. Carefully spread some margarine on the top of the sandwich while it's cooking in the skillet. Cook for 2-3 minutes, until golden brown and crispy on each side. After you get it out of the skillet, carefully pull it apart and insert the apple and lettuce.

It sounds crazy, it looks strange, but it tastes wonderful!

Photobucket

November 21, 2010

Crock Pot Apple Butter with Cinnamon Raisin Bread


Appley, cinnamony goodness on homemade bread, this is fall food. Have you noticed how all carbs are my weakness?? There are those people who think bread is only to hold a sandwich together (my husband) and then there are people like myself. I can barely wait for the bread to cool from the oven before I slice off a hunk - no accoutrements needed - just plain bread. I love the smell of it baking and the way it fills the whole house with its homemade scent. Ahhhh!

The next day when the bread is cooled and "day old" I love slathering on homemade toppings like butter, jelly (made only with juice), jam (made with juice and a bit of fruit chunks), preserves (chunky fruity goodness), or apple butter. I've made all kinds of jams and jellies, but there is something about apple butter that can't be beat.

Apple butter is very easy to make when you put it in the crockpot, which is about the only thing I ever use mine for. {This is completely off-topic plea, but will someone send me some good crockpot recipes or cookbook? I would really like to use my crock more often, but I've never been tempted by the recipes I've seen as they all look brown and mushy - not fresh and appealing.} This recipe will fill your house with such a delicious aroma, you'll have trouble waiting to eat it - I promise! It's also a great gift to give. Your friends and family will love you for taking the time. You can make it with apples or pears and they both turn out abou the same taste, so choose what's on sale or what you've been given. My wonderful Aunt Sharon just shared a huge box of cooking pears (they stay hard and don't get soft, so they are only good for cooking with) so I decided on pear butter. Aunt Sharon, there is a jar with your name on it!

Crock Pot Apple (or Pear) Butter
Makes 9-10 pints
9 qts of applesauce or pearsauce, homemade or store bought
2 tbsp of ground cinnamon
1 tsp ground cloves
1/2 tsp of allspice
1/2 tsp anise seeds (optional)
4 c sugar or sugar substitute

If you have just been to the orchard and returned with mountains of fresh apples or pears, you need to make applesauce first. Peel, core and quarter your fruit, unless you have one of these handy food mills for the counter or your Kitchenaid. If you have one of these, you don't need to peel the fruit, since you will be running it through the mill. In any case, you are starting with as many fruit as you can fit into your crock pot and add a little bit of water, just a splash on the bottom. I use a massive 8 1/2 quart crock pot (if your our crockpot is smaller, just reduce the ingredients proportionately). Cook the fruit on high until you have soft mushy apples or pears. You can use a hand masher to aid them in breaking down. After about 12-24 hours (depending on the types of fruit and how hard it was to start) you'll have unsweetened applesauce. This is delicious on it's own and perfect for canning or freezing.

If you want fruit butter, you need to continue in the slow cooker. Add the spices and sugar to your applesauce.  Stir well and set the pot to low with the lid somewhat vented (use a spatula or chopsticks under the lid to keep it up.)  Cook for 10-12 hours. Everything will get dark brown and smell incredible! After cooking you can use an immersion blender to puree it all so it's extra smooth or do it in the blender. Then you can freeze the apple butter or can it in glass jars making it just as shelf-life stable as store bought.

To can, put warm butter in jars and wipe the tops clean. Seal with canning lids and screw tops. Put the jars in a large pot filled with a couple of inches of water. Bring the pot to a boil and boil for 10 minutes. Remove jars with tongs and set on a kitchen towel until cool. You will hear a popping sound when the lid cools enough to seal. This means you have a good seal and the product will be shelf stable. You can remove the screw lids to store.

To make my tasty cinnamon raisin bread you start with a sweet yeast dough....

Basic Sweet Dough (Sourdough Version)
see bottom of post for commercial yeast recipe
6 c flour
1 tbsp salt
1/2 c sugar
1 c starter
1/2 c oil
1 c warm milk
1/2 c warm water

Whisk only 4 cups of the flour, salt and the sugar in a large electric mixer bowl. Add your starter, oil, and water and mix with a bread dough hook. Slowly you add the other two cups of flour. You may not need all 2 cups, so add slowly. The way you know the dough is ready is when it forms into a "ball". In the mixer, the dough pulls cleanly away from the sides of the bowl and forms a literal ball, like it the photo below.

I love my 6qt KitchenAid mixer. It was a splurge from the outlet store, but it's been worth every penny. If you are using a hand mixer, you'll need to take the bread out of the mixer bowl and knead it on a floury surface for about 10 minutes until the dough sticks well to itself and not the counter and does not spread out immediately when you let go, but instead holds it's shape.

After the dough is well formed, it needs to rise to double in size. Put the dough in a greased bowl and cover it with plastic wrap. Place the bowl in a warm draft free place (like your oven with only the light on) overnight or around 12 hours.

The next day make the cinnamon goodness for the middle. You could make just about any kind of filling to flavor the bread at this time like: orange, lemon, strawberry, cheese, strawberry and cheese, gingered apple, chocolate, or maybe a candied pecan. Really let your imagination and your family's favorites flavors determine what to make. Your only limitation is don't make anything too wet or it will interfere with the bread's composition.

Cinnamon Raisin Bread Filling
2 c raisin
3/4 c sugar
7 tsp cinnamon
4 tbsp melted butted

Combine raisin, cinnamon and sugar in a small bowl.

Once the dough is doubled in size, deflate it gently and divide it in half to form two loaves. Roll out one half of dough on a floured surface into a 10"x12" rectangle with a rolling pin or a glass. Sprinkle with half the cinnamon mixture and drizzle with half the melted butter.

Carefully roll the dough up starting at a short side to make a long rolled log.

This is a messy job, so be warned. If it sticks to the counter, gently lift with a bench scraper or spatula.

When done you'll have this unattached end, be sure to give it a good pinch to seal it back onto itself.

Carefully place the dough seam side down in a greased loaf pan. I usually have to create an "S" shape with the dough to fit it in the pan. Repeat the whole process with the other half of dough to form two loaves. Let loaves rise in a warm place for about 2 hours (or 45 minutes if you are using yeast) until the dough is doubled and doesn't spring back when you touch it gently with a finger.
Bake in a 350 degree oven for 30 mins. Cool for 5 minutes in the pan and then cool completely on wire racks. Always use a serrated knife to cut bread so you don't tear or compress the loaf.

Sweet Dough Recipe
using Commercial Yeast (from Martha Stewart)
2 cups plus 1 1/2 teaspoons warm water
2 1/2 teaspoons active dry yeast
5 3/4 cups bread flour, plus more for dusting
2 tablespoons nonfat powdered milk
4 teaspoons sugar
1 tablespoon salt
3 tablespoons unsalted butter, melted and cooled

In the bowl of an electric mixer, combine 1/4 cup warm water and yeast. Let sit until yeast is foamy, about 10 minutes (this ensures your yeast is healthy and active). Add flour, powdered milk, sugar, salt, 3 tablespoons melted butter, and 1 3/4 cups warm water. Mix, using the paddle attachment, on low speed for 1 minute. Change to dough hook, and mix on medium-low speed for 7 minutes. Or knead by hand, 15 or 20 minutes. Let rise in a greased bowl for about 1 1/2 hours. Follow directions above, but your second rise time will only be about 45 minutes.

LinkWithin

Related Posts Plugin for WordPress, Blogger...