Showing posts with label summer. Show all posts

July 17, 2015

Watermelon Feta Salad


This is the opposite of complicated. It's so simple, it's not really a recipe. It's the perfect dish to bring to a summertime gathering. I just served it at our family reunion and was reminded how much people like it.

Ingredients
Half a seedless watermelon, cut into chunks
6-8 oz of crumbled feta (or blue) cheese
Bunch of fresh mint leaves, minced
Balsamic vinegar

Put watermelon chunks, cheese and mint into a large bowl and toss together. Drizzle balsamic over top if desired. You can also add strawberries to this salad if you like.


Photobucket

May 8, 2014

Soapy Olafs- Perfect Teacher Gifts!!


We made these incredibly cute Olaf soaps for teacher gifts this year. The idea was based on what we had previously done with the soap snowballs. This time, we took it up a notch and formed OLAF!!


We first, formed the head and body parts and stacked them together while they were still wet. Like an actual snowman, you need to have some "flatness" where the parts meet so they will stay together. The next day, while the soap was still soft, but not wet, we gently inserted the twigs we cut from our bushes. The hair twigs were short little things and the arm twigs had to have forks in the end to qualify. Then we took a break and left them out on the porch for a week or so.

We purchased Sculpey clay in black and orange and we formed LOTS of buttons, eyes, and noses. The eyes were just round balls, the buttons were flat sort-of hexagons and the noses were bent cone shapes. We baked the clay in the oven and then glued (with Elmers so it would come off when wet) them in the appropriate places. We could have made his tooth too, but I forgot to buy the white and then the kids ran out of steam!

When Olaf's body was dry and harden, we boxed him up in a clear plastic PVC 5"x5"x7" container with a fancy drink umbrella glued to his hand, and a summery napkin behind for the background. We used playdough for his towel underneath (and a little more glue) to keep him from sliding around on the slippery gold "sand" bottom of the box.


Once his was all boxed up, the kids added a sun shaped tag cut with my sister-in-laws Cricut that said, "Teachers have fun... IN SUMMER!!" Soooo excited to give it them away to our deserving teachers next week!

Here's what you need if YOU want to make soapy Olafs...


  Photobucket

May 30, 2013

Cranberry Cheesecake Shakes

 
This was a start of the summer treat for my kids. It turned out with a beautiful pink color that would make a great drink for a girls summer party. Frosty pink happiness!

I keep cranberries in my freezer year round, because I love their tartness and they freeze so well. And then I always have cranberries to make Cranberry Coffee Cake or Cranberry Spice Granola or good old fashioned cranberry relish, which should not be relegated to just the Thanksgiving table.

I remembered years ago I tore a page out of Family Fun for a cranberry milkshake. I thought it was a little strange, but why not? Today was finally the day to make them. All the kids liked the recipe, since ice cream before dinner is a big deal. I think next time I'll actually make them with ricotta cheese instead of the cream cheese. I also used sweetened almond milk which I think added another layer of flavor, but you could use the original plain milk.

Cranberry Cheesecake Shakes
1 c cranberries
1 1/2 c almond milk
2 tsp vanilla
3 oz cream cheese or ricotta cheese
vanilla ice cream

Put the cranberries and milk in the blender. Pulse until smooth and a beautiful pink. Add vanilla and cheese, pulse again. Add enough ice cream to fill the blender and make a thick rich shake.

You could also add some vanilla whey protein powder to this one easily.


Photobucket

May 24, 2013

Shark and Beach Cupcakes

Aren't these little guys so cute? End of the year meant we needed some summertime cupcakes according to Banana Girl. She insisted on sharks "for the boys" and "beach for the girls". I'm not sure that all were eaten according to her rules, but I know the kids enjoyed them.

The beach cupcakes are icing and then sprinkled with crushed ginger cookies (which I think taste better than graham crackers, but either would work). Add a little Teddy Graham bear and a drink umbrella that I picked up from the grocery store and...total cuteness!
 
The sharks were just as easy. Ice the cupcake with blue tinted frosting and make sure to leave peaks for yours waves. Cut out blue shark fins and insert them into the frosting right before serving. If you do it ahead of time the icing will create grease stains on the paper. You could go all out and create fondant fins, but I was a taking the easy way out on this one!
Happy Summer!
Photobucket

March 20, 2013

Beautiful Berry Cream-Filled Tart: My Favorite Dessert


This dessert seriously makes me swoon. It is my all time favorite dessert, ever since I was a teenager. I was that weird kid that was thrilled to see fruit in my lunch box (thanks Mom). I guess I have a special place in my heart for berries because they are so perishable and the season is pretty short. You gotta get 'em while the getting is good. Kinda like kisses from my kids - I'll take them whenever they are ripe for taking. Even the wet sloppy ones from the 2 year old!

The tart may look a little difficult because it's so showy (like the pavlova) but it's really not. Pull together the ingredients for the crust and press it into a pie pan or a tart pan (see below) and then make the creamy filling. After that, it's just a matter of piling on the berries!

Beautiful Berry Cream-Filled Tart

Ingredients
Pastry Shell
1 1/2 c flour
1/4 c sugar
1/8 tsp salt
8 tbsp cold butter, cut into small pieces
1 egg yolk, beaten with 2 tbsp heavy cream

Put flour, sugar and salt into a bowl of a food processor. Pulse to mix. Add the butter pieces and pulse. Add the egg/ cream and pulse until the dough is chunky and holds together when squeezed. (You can also do this in a bowl with a pastry cutter, it just takes more work.) Dump the dough onto was paper and chill in the fridge for 30 minutes. 

Roll dough out into the shape of your tart pan. This dough makes enough for a 9" round pan. (A tart pan has a bottom that comes apart from the sides like a cheesecake pan to make serving a cutting the tart easier. You just lift the bottom of the pan out of the sides and serve the tart on the bottom. You can use a pie pan, just serve it right out of the pan like a pie.) Fit the dough into the pan and cover it with foil or parchment paper. Put some pie weights or dried beans on top of the foil to keep it from puffing up and bake at 425 degrees for 5 minutes. Reduce oven temperature to 350 degrees, remove the weights, prick the bottom of the pastry with a fork. Bake 15-20 minutes, until golden. Cool on a wire rack.

Cream Filling
2/3 c sour cream
1 (8 oz) package cream cheese, softened
2 tbsp lemon juice
1/2 c sugar
1 tsp vanilla
1/4 c heavy cream
Beat sour cream, cream cheese, lemon juice, sugar, vanilla, and cream together in a large bowl. Spread mixture over cooled pastry shell. Arrange berries over the top and garnish with mint leaves if desired.

Chill between 1-4 hours before serving. This doesn't keep well in the fridge for more than a day, since the crust gets soggy.
 
Photobucket

February 15, 2013

Lemon Love Note Bars - Sweet and Sour


These bars are sweet and sour all at the same time

...kinda like marriage.

I love my husband. It's true, he's the man for me. He puts up with my moods and endless chatter. He brought me flowers and a huge balloon for Valentine's Day, and the man HATES balloons. He eats everything I put in front of him. He can build me anything I ask for. He's the most supportive and encouraging person I know. He's there for me whenever I need him. (Boy, oh boy, have I realized how much I need him lately.) We are a team and a great one at that. (I'm pretty sure we could win the Amazing Race.)

However, there are definitely times when we seem to treat each other more "sour" than sweet.

Everyone has some sour moments - right? At this point in our marriage (ten years) I'm pretty sure it's normal. I mean, you are not really supposed to get along with someone every single day right?

I logically knew it wouldn't all be roses before we got married. I even engraved it on the inside of his wedding band, "Come What May". And while I don't love being in the down times, I do love the wonderful tenderness that comes after we get out of the funk.

The sour, just makes the sweet all that much sweeter.

Honey, MacGuyver, Babe, Husband....this one is for you. I love you...come what may.

Lemon Love Notes

Ingredients
1 c butter
2 c flour
1/2 c powdered sugar
1 lemon, zested and juiced
4 eggs
2 c sugar
4 tbsp flour
1 tsp baking powder
1 1/2 c powered sugar
1 tsp vanilla
2 tbsp butter, melted and cooled
3 tsp milk

Blend butter flour and sugar together with pastry cutter or a fork. Pat into a 9x13" ungreased baking dish. Make sure this is very flat and even. Bake at 350 degrees for 15 minutes. Cool until you can touch the baking pan.

While that is baking and cooling, make the filling. Mix together zest of one lemon and the juice of the lemon with eggs, sugar, flour and baking powder. Pour this on the cooled crust and bake again at 350 degrees for 25 minutes. Cool again.

Melt butter. After the bars are cooled off enough you can touch the pan again, make the icing. In a small bowl, whisk together the sugar, vanilla, melted butter and milk. Pour over the top of the pan. Cut into small bars because these are super rich. They will keep fresh for only a few days.
Photobucket


February 9, 2013

Apple Carrot Slaw


I had some carrots in the fridge that needed a home and I just didn't feel like cooking them since the weather here in GA has been so warm. It's absolutely crazy... my daffodils are trying to come up. I have really missed winter this year. I know those of you up north think I'm crazy, since you are underneath a mound of snow.
Mom and Dad were flying back from Dad's chemo treatment yesterday and were delayed with all the flights being cancelled. I was a little worried about them, but they are home, safe and sound. Dad is exhausted, but hanging in there.

On the other side of the family, my father-in-law has moved into an independent living place so we are sleeping better around here, since we don't have to worry about him on the stairs. Thank you all for the kind words and prayers.

This recipe is perfectly refreshing with a roasted chicken and homemade wheat bread. I love the addition of celery seeds. I usually add those to our cabbage slaw because that's how MacGuyver's Mom makes slaw. I never thought to add them to a sweet slaw. 

I have the perfect imitation recipe for Chik-Fil-A's carrot slaw and this recipe somewhat reminded me of that, so I left the raisins out of the original recipe to make it different to my family. Let me know what you think.

Apple Carrot Slaw
Adapted from Feast on the Cheap, check out their beautiful photo and original recipe

3 crisp sweet-tart apples, cored and cut into matchstick-size strips
3 large carrots, washed, peeled and coarsely grated
2 tbsp sweet onion, minced
3 tbsp low-fat mayo
1/3 c cider vinegar
1 tbsp real maple syrup
1 tbsp celery seeds
Salt and pepper to taste
Whisk mayo, vinegar, celery seeds, maple syrup, salt and pepper in a medium bowl. Set aside. Prep the slaw ingredients and combine in a large bowl. Toss with the dressing, cover and refrigerate for 30 minutes before serving.  
Photobucket

November 16, 2012

Apple Pie Smoothie


Perfect fall goodness in a cup. It's a guilt free apple pie smoothie. All of the flavor and sweetness of an apple pie, but healthy enough to drink after a run.

I made this one up because I like to drink a smoothie after working out, but I didn't have any fruit other than apples laying around. I have never blended a whole apple, only apple juice. Turns out the fiber makes it pretty filling. The kids tried it the next day and loved it, so we have a new smoothie in the rotation. I wonder how it would work as a popsicle in the summer?

We had these wonderful apples that we picked in Ellijay at our favorite stop: R&A Orchards like we have in previous years. This year was pretty hard on the harvest. Warm crazy weather will reek havoc on an orchard. All of the apples were dropping right off the trees and the Georgia Apple Festival hadn't even occurred! We managed to pick a few and of course I bought bags and bags of "seconds", which are perfectly good apples in my opinion. I made a bunch of applesauce, but no apple butter this year. I was going to make Apple Pie Soup and that's where the revelation came in - ah ha - I could make a smoothie with apples. Apple Pie Smoothie! 

Apple Pie Smoothie
1/2 small apple, peeled, cored and chopped
1/2 tsp apple pie spice
2 c vanilla almond milk 
1 scoop protein powder, optional
ice cubes

Put it all in a blender and whir into a creamy smoothie. 


{Almond milk is a new product in our household and we have enjoyed it. I like it because it keeps much longer than cow milk. I used Silk brand almond milk, pictured here and it's already sweetened, so I didn't add any sweetener to this smoothie. You could use milk and add honey and almond or vanilla flavoring if you like.}


Photobucket

September 17, 2012

Eggplant, Roasted Tomato, Polenta Stacks


When this month's Secret Recipe Club assignment arrived, I went straight to the blog of A Couple in the Kitchen. I was jealous you see. 

Oh, how I wish I could be part of "a couple in the kitchen". I wish my wonderful husband cared just a little about cooking, but that is just, not how he rolls. I mean, he REALLY enjoys the eating, and definitely helps with the cleaning, but he is never gonna join me in the cooking. It's just not his deal. With all of his other wonderful MacGuyver traits, I suppose that is okay. I guess I've come to terms with it. 

It's just, when I read the title of my new friends Amy and Chris's blog, I couldn't help but be a little jealous. I wanna be a couple in the kitchen...waaah. I know, I know. You are saying, "get over it Aimee"!

After I looked through Chris and Amy's blog, I came upon Slow Roasted Tomatoes and I knew this was the recipe I wanted to make. We have tomatoes coming out our ears. I canned some, sliced some for sandwiches, eat some right from the bush, gave away some, and even tossed a few rotten ones to the Girls in their coop. (Yes, until recently, they were still trapped in their coop so they didn't eat my hard work.) Roasting some tomatoes and storing them in oil, seemed like a perfect way to prolong our season.

Once I had some roasted lovelies, I had to think what to do with them. I froze several half pints for presents later in the year. Hee hee, I'm getting ready for Christmas already and I love it! I served some with my Roasted Chicken and saved some for Eggplant, Tomato, Polenta Stacks.

This easy vegetarian dinner was a product of what was laying around....lots and lots of Japanese eggplants! My one bush has given us a ton of these purple beauties. This dinner was fabulous!!! Course, if you don't have any eggplant laying around, you could always substitute zucchini for the eggplant or make orzo (small rice shaped pasta) dish also from A Couple in the Kitchen.

Eggplant, Roasted Tomato and Polenta Stacks

Ingredients
1 lg Japanese eggplant (or zucchini can be used)
salt and pepper to taste
3 c water
1 c polenta
1/4 c butter
1/2 tsp salt
olive oil
roasted tomatoes
1/4 c greek yogurt
2 tsp honey
chopped nuts for garnish (I just used an assortment we had from the pantry)

Slice eggplant into thin disks. Lay on paper towels and sprinkle with salt. Leave for 15 minutes or so.

Bring water to a boil in saucepan, add salt. Slowly add polenta and whisk into water. Reduce heat to low and cook for 5 minutes. Add butter and stir until melted and polenta is thick. Pour into a greased pan or bowl. Set aside.

Rinse eggplant with water and pat dry with paper towels. Heat a little olive oil in a saute pan or skillet. When hot, carefully put eggplant slices in pan and cook for a 1-2 minutes. Flip and cook another minute until golden brown. Cook in small batches until all the eggplant is done.

Mix honey and yogurt in a small dish.

Slice polenta into squares like you would brownies. Put a slice of polenta on each plate and then stack the eggplant on top. Sprinkle with roasted tomatoes. Add a dollop of yogurt and sprinkle with chopped nuts. Serve.


Roasted Tomatoes

Ingredients:
4 cups cherry or grape tomatoes, halved
2 tablespoons fresh basil, chiffonade (which is a fancy way of saying slice small strips)
2 tablespoons olive oil
kosher salt
freshly ground black pepper
4 cloves garlic
1/4 to 1/2 cup olive oil for storage
Preheat oven to 200 F. In a large bowl, place the halved tomatoes and basil. Drizzle with olive oil and season with salt and pepper to taste. Gently mix well with your hands. Line baking sheets with silicone baking mats (you know how I love these). Then line sheets with tomatoes in one layer, place garlic cloves in different areas on the baking sheet. Bake for 2-3 hours, until tomatoes look mostly dry. If storing, place them in canning jars, packing them in well and using a metal knife, get the air bubbles out. Cover completely with olive oil and seal with airtight lid. Store in refrigerator for up to six weeks or freezer for several months.

August 23, 2012

Canning Tomatoes


It's tomato time. After we got back from our Florida adventures, we had tomatoes coming out of our ears, enough to fill up a 5 gallon bucket twice and my garden basket (and make that yummy gazpacho).

I knew we couldn't eat the rest right away. Time to get out the Ball jars and the pressure canner and get to work. I have never canned tomatoes before, but I figured it might work out better than the freezing method I have been using. I wanted to capture the taste of home grown tomatoes for wintertime soups, pasta dishes and casseroles. I have to say after going through all of this work, they better taste good! Buying store canned tomatoes is pretty cheap and easy, so I can't say if I will go this route next year unless they taste super fantastic. But I knew I needed to try it out just to say I could do it! :) I'm I the only one who thinks like this or are there things you do just to prove you can??
Canning Tomatoes

17 pounds ripe tomatoes
14 Tbsp of bottled lemon juice
7 tsp salt
7 quart sized jars with lids and rings

Fill pressure canner with water about 1/3 full and bring to a boil.

Fill a large saucepan ¾ of the way full and bring to a boil. Gently lower tomatoes into the HOT water. Cook for about 30 seconds and the skins will split. Immediately plunge into a cold water bath to stop cooking and make the tomatoes all cozy and touchable (the opposite of flaming hot). Then you can easily pull off the skins. Dice the skinned tomatoes and put into hot clean jars. Pack them in tightly. (This is a messy step in my kitchen.)
Put 2 tbls of lemon juice and 1 tsp of salt in each jar. Make sure tomatoes have juice covering them, adding from the bowl if needed. Leave 1/2" headspace. Release air bubbles if you have them, wipe the rims and seal with lids and rings.
Process jars in boiling water pressure canner for 25 minutes at 10 pounds of pressure. Start timing them only when the gauge starts spinning and the water is boiling. After 25 minutes, remove canner from heat and allow to sit until pressure drops. When cooled, remove lid and remove jars using a lifter. Cool jars on a towel. Check for sealed lid (no give in lid when pushed down). 

 
Photobucket

August 21, 2012

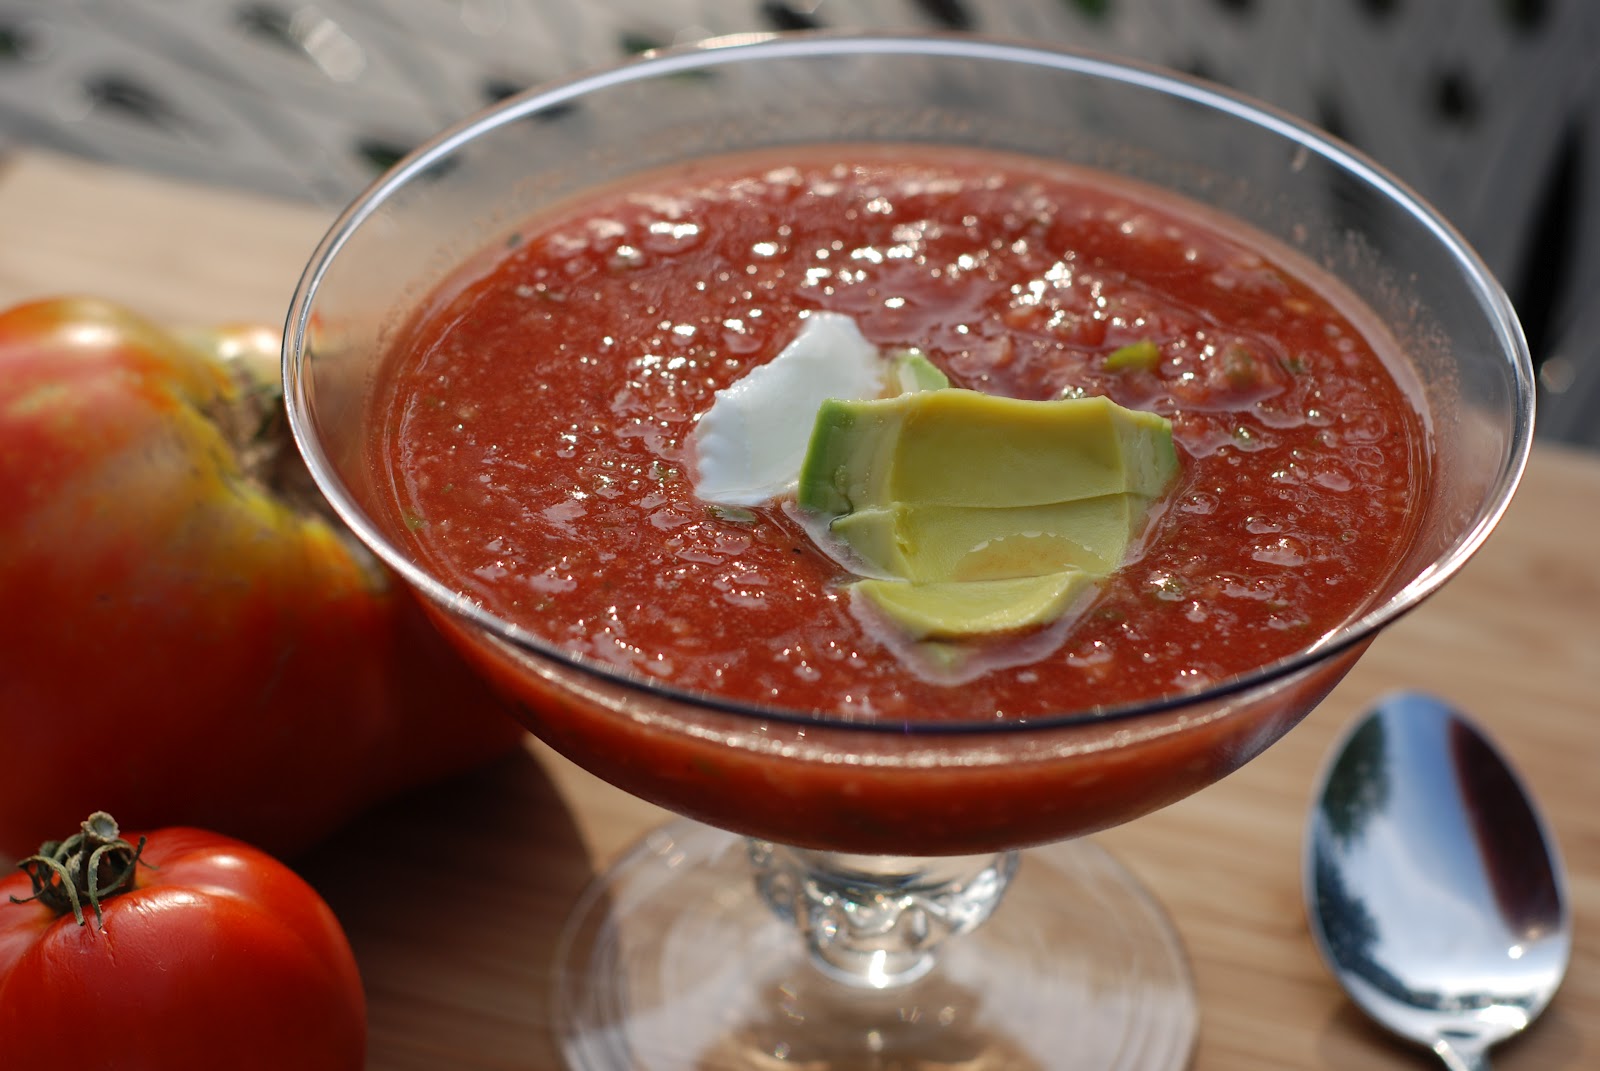
Gazpacho - Cold Tomato Soup


It's the end of summer and I love this time of year. For me, it's the change in seasons that I adore. When winter ends and spring begins I feel alive and joyful. When summer warmth comes I am ready to run around in flip flops and tank tops. I have to say, I really think fall is my favorite. Warm days with crisp nights. We get out the marshmallows and drag branches to the fire pit for smores bonfires with friends. We go camping and hang out watching the starts. Fall is bliss.

I've worked all summer long, in the garden and the harvest is paying off, but these days my garden is winding down. The beans are finished, the squash kaput, the peppers producing less each day. Today we pulled up two dead tomato plants, but at least the other are still going. We have different varieties of tomatoes planted. Last year I introduced the mini orange ones and they were amazing. This year, my new plants were Cherokee Purple and Mr. Stripey heirloom. Both had interesting color, but tasted not as bold as the traditional Better Boy that is our mainstay. They were also not as pest resistant. In fact, I'm pretty sure more bugs enjoyed my Mr. Stripey than I did! 

Better Boy, Purple Cherokee, Mr. Stripey all ready for soup
I did can (that soooo should be "jar") some of these tomatoes, which I will share with you tomorrow. It was pretty easy considering I usually only can jam. The canning jars look beautiful with the different color tomatoes in them.

Today however, I wanted to enjoy the end of summer. Today I made gazpacho. I have to say, I've never...ever had gazpacho. I'm sure it wasn't for lack of it being offered. My Mom loves the stuff, so I know she tried to get me to like it. I always declined. As usual, my Mom was right, I should have come around much sooner than this.

I'm pretty sure it was the name that put me off. It sounds so...so....tough. Like it might grow hair on your chest tough. Like take your lunch money away tough. Gestapo tough. I was intimidated. But as I've said before with souffle - wusiness needs to be confronted. I had to make this stuff. I'm proud to say...

I...have..conquered...gazpacho!!! And I actually liked it.

Of course, now that means I want you to conquer gazpacho as well (or at least be able to spell it). You may be an old pro at it like my Mom, or you may be a wussy newbie like me, but if you like fresh tomatoes, you are going to love this recipe. All you need is a food processor - no cooking involved. That's my kinda summer cooking.

Gazpacho
from Southern Living

8 tomatoes, peeled and chopped (I used several types of tomatoes, just be sure they are flavorful and ripe)
2 cucumbers, peeled and seeded
1 large bell pepper
1 small red onion, peeled
1 jalapeno pepper, seeded
1 large clove garlic
1- 32 oz bottle of tomato or vegetable juice
1 lemon, need 1 tbsp zest, 1/4 c juice
1/3 c red wine vinegar
2 dashes of hot sauce
3 tsp salt
1 tsp pepper
1 tsp paprika
sour cream
avocado

Cut tomatoes, cucumbers, pepper, and onion into quarters. Put all the chopped vegetables, the jalapeno and the garlic into the food processor. Pulse until chunky (or you can keep going til it's smooth if you don't like texture in your soup), scraping the sides when necessary. Pour into a large plastic container and add the rest of the ingredients. Stir, cover and put in the fridge for at least 8 hours or overnight.

Serve with sour cream and a sliced avocado. 

If the Tomato Peach Salad is summer on a fork, this is summer on a spoon! Thanks Mom for having patience and letting me grow into my taste buds.
 
Photobucket

August 1, 2012

Tropical Pink Dragonfruit Limeade


I've discovered a tropical paradise here in South Florida....Robert Is Here produce stand. Robert has one of those fun stories that I love sharing with my kids, stories of personal achievement. As Robert told me himself, it's a lesson on hard work, honesty and integrity. 
Robert and I talked...a lot!
Robert started his business at the tender age of six years old. He set up on a road to sell his father's cucumbers with a giant sign that said "Robert Is Here" and the name stuck, so the place is still called Robert Is Here. He soon progressed into hiring his neighbor to work for him when he was at school. Today, many years later, his business is still thriving with many friendly employees, loads of exotic fruits, fresh vegetables, and the MOST amazing milkshakes!! We came for the key lime milkshake, which was a perfect blend of sweet and tart - delicious, but we loved the mamey and the guanabana flavored milkshakes just as much, if not more. They were made with fresh fruit and they were delicious, creamy and vanilla with the fruit taste too - seriously good stuff. 
Sharing a mamey milkshake
We stopped at Robert's on our way to Key Largo, the northern most key and had such a delightful time, we stopped at Robert's again on the way home. We stocked up on avocados (and made guacamole three times while on vacay), the most delicious juicy Kitt mangoes that the staff was happy to slice up for us. They were so perfectly ripe that the juice dripped down our arms while eating them.
juicy mango!
We enjoyed longans (like lychee), key limes, jack fruit, tomatoes, and intriguingly named dragon fruit. 
Source: Tropical Fruit Nursery
Dragon fruit is strange looking from the outside, but the variety we had was beautiful fuchsia pink with small black seeds on the inside. I cut it in half and just scooped the fruit out with a spoon, much like an avocado.

Look at this beauty...

With this color, I knew I wanted to make something fresh to show it off. I figured it would make a beauitful drink and boy was I right. We had some limeade concentrate in the freezer which I mixed up and added the chopped dragon fruit. When stirred up, it all became this gorgeous pink color. It didn't change the flavor of the drink because the dragon fruit flavor is so mild, something like strawberries. I think this fruit would make an incredible mixed drink with natural coloring.

Tropical Pink Dragonfruit Limeade
1 can limeade concentrate
1/2 dragonfruit

Mix up limeade with water and stir in chopped dragonfruit. Let sit in fridge for at least 30 minutes to overnight. The color will deepen over time. Add tequila for an adult dragon-rita.
 
We tried it in orange juice too and it created a beautiful translucent coral color. A a little of the fruit goes a long way in coloring a drink so I had plenty of fruit to make different drinks.

Next time you are having a party and need a punch or fun drink to make, give dragon fruit a look. You won't be disappointed with this kinda color!!


Photobucket

LinkWithin

Related Posts Plugin for WordPress, Blogger...