April 25, 2012

Carrot Kohlrabi Bake


My Sausage Boy had a playdate last week with one of his preschool pals. When I went over to their house to pick him up the mom, Amy, and I got into a discussion about her winter garden. Apparently she has a green thumb and her Dad has an emerald thumb. He can and does grow anything. He set Amy up with lettuces, broccoli, kale, and kohlrabi for her winter garden. Turns out Amy loves it all BUT the kohlrabi. Being her friend, of course I told her I would take it if she insisted. I played it cool, but I was pretty excited to get my hands on the kohlrabi. I mean it's not something you see in the local Kroger and I was having a dinner party for my family, they will eat just about anything. I figure if I screwed it up, I was still pretty safe. See I've eaten it grated raw in slaw, but I wanted to take it into my kitchen and make something with it.

This is kohlrabi in all it's glory.

I admit, it is a strange plant. You eat the bulbous part that grows just above ground. You can eat the greens too. It's a member of the cabbage family and tastes kinda like a radish, but sweeter.  I got mine home and pulled off the roots. Then I snapped off the leaves and gave those to the Girls - who were pretty excited about something new. Then I peeled the bulbs so they would not have a "woody" texture since I was baking them. Once I chopped them up, they were perfect for this recipe. I bet I could even convert Amy into a kohlrabi lover with this one. The carrots are sweet and the kohlrabi adds some bite. It's delicious and my family agreed.

Carrot Kohlrabi Bake
from Birds & Blooms

Ingredients
3 medium kohlrabies, peeled and chopped
4 medium carrots, peeled and sliced
1/2 c chopped onion

3 tbsp butter
2 tbsp flour
1/2 tsp salt
dash of pepper
1 1/2 c milk
1 tbsp dried parsley
1 tbsp lemon juice
3/4 c soft bread crumbs

Microwave carrots and kohlrabies in a little water on High for 10 minutes. Drain off the water.

In a small skillet, saute onion in butter until tender. Add flour, salt and pepper. Stir until blended. Cook for 2 minutes. Gradually whisk in the milk a little at a time. Each time you are waiting for the sauce to thicken before you add the next bit of milk. Add about 1/4 c each time. Bring to a boil and stir until thickened again.

Pour sauce, parsley, lemon into carrot/ kohlrabi mix and stir. Dump into a greased two quart baking dish (basically a little smaller than a 9x13 pan). Sprinkle the top with bread crumbs. (See recipe below to make them.)

Bake at 350 degrees for 25 minutes.

Soft Bread Crumbs
frozen bread
food processor

I keep these on hand in a bag in the freezer. My kids don't like the ends of bread loaves so I collect them in a bread bag in the freezer. I also use my mistakes - bread that just didn't rise enough when I made it. Or rolls that are always leftover from whatever party/ holiday event was most recent. When I have enough bread frozen, I pull out the food processor. Just put the slices in and turn that baby on. Pulse it until you have large crumbs, then put them all back in the bag and back in the freezer. Easy! You can use them to top mac n cheese, or just about any casserole. You can also use them to bread fish like this. What do you put them on?
Photobucket

April 23, 2012

The Most Incredible Poundcake Recipe EVER

UPDATE: Welcome pinners. This has become my most popular recipe to date! Wow, you all are really looking for a good great poundcake. I can tell you, you've found it. I hope while you are checking this one out, you'll poke around some other recipes. One easy way to do this is by season. Click on the seasonal link in the cloud list on the right hand sidebar and see what you can make right now. Or you may be interested in the other cakes I've made, including some fun birthday cakes. Either way, I'd love to hear from you, so leave a comment or shoot me an email. tochickenville {at} gmail {dot} come. Thanks for visiting!

------------------------------
Secret Recipe Club alert!! Why "secret"? In the Club we are assigned another food blog from the members and then secretly make one of their recipes. This month, I was assigned Anne From My Sweet Heart, a blog laser focused on desserts. Just so happens this is a GREAT time for me to make a cake. My aunt, my mother-in-law, brother, AND sister-in-law (she of the Kickin' Vinaigrette dressing) all have birthdays in April!! The kids spend at least two days making all of their cards and sometimes I get to spend some time in the kitchen cooking up a celebration dinner. This month, I got to make dinner for my brother and his wife for their birthdays. My parents joined us for the evening. It was loud  (actually our house is always loud with four kids) with lots of laughing and fun. The big kids put on a gymnastics's show AND a theatre production.

Mom and Dad brought the main dish, a pork loin, which I seasoned and my husband grilled. As usual it was moist, delicious and perfectly delicious. You cannot miss with my Disappearing Pork Loin recipe. I made Kohlrabi-Carrot Bake, Broccoli Salad (which I did not get enough of on Easter), homemade Honey Wheat Seeded bread, cheese grits, a green salad and the afore mentioned delicious pound cake.

This cake is moist and held a perfect crumb. The bottom crust was crispy, but the inside was soft. I served it with strawberries macerated in sugar (directions in the recipe below) and Breyers vanilla bean ice cream. My husband went back for a plain piece because he said the berries just got in his way of tasting the amazing cake. I swapped out a little of the vanilla in the original recipe for some almond, which took it over the top (this does not make it almond tasting, it only adds a little depth of flavor). Whatever you choose, make sure it's good quality, pure extract, not imitation, because it will be the dominate flavor.

This recipe turned out to be the best poundcake I've ever tasted!! Right up there with my favorite cake - Famous Fresh Strawberry Cake. I'm not kidding you folks, this was really THAT good. Find an excuse to make this cake and you will be a hero to your family.

Cream Cheese Poundcake
From My Sweet Heart

3 sticks unsalted butter, at room temperature
8 oz. cream cheese, at room temperature
3 cups sugar
1/2 tsp salt
1 tbsp pure vanilla extract
1 tsp almond extract (my preference or you could do lemon, more vanilla, or something else)
6 large eggs
3 cups of sifted flour
1 tsp baking powder

Preheat your oven to 325°F. Spray a bundt pan with cooking spray and then sprinkle some flour over the spray. Shake it around until the flour covers the oil and then tap out the excess. It should look like this. If you don't have a bundt pan, you can bake it in two 8 1/2 by 4 1/2 inch loaf pans for 60 minutes.
In the mixer bowl, beat the butter and cream cheese together until creamy. Gradually add the sugar with the mixer still running, and continue to beat until light and fluffy. Beat in the salt and extracts. Add the eggs to the mix, one at a time. Beat well after each addition. This is easy when you have a little helper.

Stop the electric mixer and sift the flour and baking powder into the bowl. With a rubber spatula, gently stir the flour into the mix, until no traces of flour are seen and the batter is smooth.

Pour the batter into the prepared bundt pan. Bake on center rack for 75 minutes. The top should be golden and become slightly cracked; and when a toothpick inserted into the center comes out with a few moist crumbs.  Transfer to a wire rack and let the pans cool for 15 minutes. Carefully turn the cake out of the pan onto a wire rack for cooling.

To serve with strawberries. While cake is baking, wash, hull (remove the stems) and cut up the berries. Sprinkle with sugar. Let stand in fridge, every once in a while, give them a stir. You want them to sit for an hour or so. When they are ready, there will be a nice juicy, sweet syrup in the bottom of the bowl.

The most perfect Poundcake recipe EVER. Happy Birthday Nadia and Jason!!

Photobucket

April 22, 2012

Cheesy Crackers

We made these delicious, crispy cheese crackers in animal shapes to celebrate the arrival of spring. We made them in small animal shapes like pig, bunnies, and chicks. Please note: no animals were harmed in the making of these crackers! ;)

These are little like Cheeze It's but way better! Maybe more like a cheese straw (if you are from the south). They were for a preschool snack and were a big hit. What kid doesn't love cheese and crackers??

Besides the rolling out part, they were really easy. They were delicious plain, but you could serve them with a soft dip or hummus. They are pretty brittle, so it would need to be a smooth dip to keep them from breaking.

Cheesy Crackers
from Family Fun Super Snacks
Ingredients
1 1/4 c flour
1/8 tsp baking powder
1 c (4 oz) grated sharp cheddar cheese
1/2 c cold butter, cut into chunks
1 tbsp and 1 tsp ice water

Preheat your oven to 400 degrees. Pour flour and baking powder into food processor and turn on to combine. Add the cheese and the butter. Process until well mixed. Add the water and process again. You should end up with a dough like below.

Since we mixed the entire thing up in the food processor, it was easy clean up, we just tossed the parts in the dishwasher.

We rolled out dough out to 1/8 inch thick, but I think a little thicker would have been better. Use plenty of flour on your rolling surface and pin. Cut into your shapes with cookie cutters and place on an ungreased sheet pan. You know I'm going to say, use a silpat here! ;)

Bake for 7-9 minutes until the bottom is golden. Cool on the baking sheet. Store crackers in Tupperware for freshness.
 Photobucket

April 17, 2012

Grilled Salmon with Herb Lemon Butter

This recipe was just what I needed after the week of "junk" food on our vacation. I paired it with potatoes and fresh green beans. Finally...what dinner should look like.

Grilled Salmon with Herb Lemon Butter
adapted from Food Network.com

Ingredients
1/4 c butter, softened
2 Meyer lemons, zested
1/2 tsp dill
1/2 tsp chives
1/2 bunch thyme, finely chopped or 1/2 tsp dried thyme
1 small clove garlic, smashed and finely chopped
salt and pepper
4 (6-ounce) salmon fillets, skin-on
olive oil
Remove the salmon from the refrigerator and let come to room temperature. In a small bowl, combine the butter, zest, herbs and garlic to make a compound butter. Mix well. Preheat grill to medium hot.

Coat the fish with olive oil. Place the salmon, skin side down, on the clean, preheated grill. Cook for 8 minutes. As the salmon cooks it will turn from translucent orange to opaque pink.

Turn the salmon over and cook for another 2 to 3 minutes. Remove from the grill and top with the room temperature compound butter. The butter should act as a sauce and melt over and coat the grilled salmon.

Bring on the summer!!

April 11, 2012

Attempted Murder in Chickenville

This morning there was a murder. It was worse than any horror movie: blood, fangs, claws and

...feathers.

Last night one of these

tried to eat these.


It was not pretty.

Thank God, we have Lovey.

Lovey the Loudmouth came to the rescue. At 12:31am Lovey started bawking, and bawking, and bawking. This is not normal with chickens. They like their sleep as much as I do. They squawk here and there during the day, but NEVER at night. I was immediately awake and thinking about how annoying that sound was. I knew it was Lovey. I woke up the "sleep-through-all-babies-and-chickens-in-need" man next to me. He jumped out of bed, grabbed shorts, shoes and a flashlight - all the necessary items for a major investigation and headed outside to the coop. Lovey kept up the noise the entire time.

True to his hunting nature, my husband came quickly running back in the house, got his pellet gun, and ran back out. I quietly watched all the commotion from our bathroom window where it was warm and safe. I had no idea if the Girls were facing a coyote, an owl, a bear (okay probably not that).

Through the window I saw my handsome, fierce protector of a husband raise and take aim right where the chickens sleep. I was shocked! Maybe one of the Girls was so hurt he needed to put her out of misery? I was confused and worried. The whole time he was out there, Alan talked softly to the hens, keeping them calm. He quickly shot the deadly attacker INSIDE the coop...a crafty possum. That creature had gotten it's way inside the inner sanctum, right underneath the sleeping hens.

Only Lovey had the sense to wake up and cry out the alarm!! Alan made sure the possum was good and dead and not just "playing possum" then hauled it out of the coop, where it lay this morning.

Amazingly not ONE of the chickens was harmed in all of this. The possum had just started it's nightime stalking and Little Lovey woke us in time to save each and everyone of her friends. All the Girls stayed very still when the shots were fired to kill the predator. We are pretty sure this is the same possum that we've caught in our traps before, so he seemed determined to get a juicy fat chicken dinner.

This morning, when I went out to check on everybody Lovey was quietly sitting in the nesting box. She just stared hard at me when I came in.


Little Lovey Loudmouth has been commended for her bravery in apprending the murderous possum with a fresh banana. Love her!

Photobucket

April 10, 2012

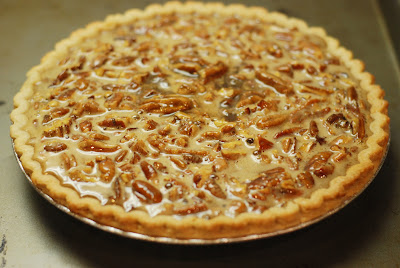
Real Pecan Pie...Frozen

I love pecan pie, but NOT the nasty slimy middle. I solved this problem one time when I bought a piece of pecan pie from the freezer section - Edwards or some brand. I figured it was only one piece so I couldn't go overboard, but when I got it home it was all I could think about (restraint is not my strong point). That silly piece of pie was calling my name. I got home, ripped open the cardboard package and ate the entire slice without letting it thaw or even using a fork.

Turns out it was the best pecan pie I ever ate! It had nothing to do with the brand but the simple fact that the pie was still pretty frozen. When the jiggly middle is frozen it turns to a wonderful gooey, caramel like treat that I LOVED! Now, I make and serve pecan pie to my guests and then freeze my leftovers for me to enjoy another day. I encourage everyone to try pecan pie frozen - you may love it. I've even converted my very southern husband to freezing his.

I decided I needed to make a pecan pie because my husband's wonderful Aunt and Uncle gave us a HUGE bag of pecans. Apparently they have the largest pecan tree in Fayette County, which is really saying something. They gathered the nuts for us and I put the kids to work cracking them with this cool contraption. I won't say it makes cracking the pecans easy...let's say easIER. Once we had enough nuts, I was all set to make my pie.

Real Pecan Pie
adapted from Baking Illustrated by way of Brown Eyed Baker

Single crust pie shell, store bought or homemade
6 tbsp butter, cut into 1-inch pieces
1 c brown sugar
½ tsp salt (if using unsalted butter)
3 eggs
¾ c light corn syrup
1 tbsp vanilla
2 c pecans, chopped into small pieces

Toast your pecans in a dry skillet on the stove for a few minutes until they smell nutty or toast them on a tray in your toaster oven. Just be sure to watch them as nutty and delicious can turn burnt VERY quickly. Let cool.

Preheat oven to 400 degrees. Prick the crusts with a fork all over the bottom.

Then cover the crust with aluminum foil and fill with dried beans. This keeps the pie shell from puffing up with air and becoming brittle. Bake for 15 minutes.

Remove foil and beans weights bake 5 additional minutes until crust is golden brown and crisp. Remove from oven and reduce the temp to 275 degrees.

Melt the butter in a double boiler. {See my new one??} Remove from heat and stir in the sugar and salt with a wooden spoon until the butter is absorbed. Beat in the eggs, then the corn syrup and vanilla. Return to this stove; stir until the mixture is shiny and hot to the touch, about 130 degrees on an instant-read thermometer. Remove from the heat; stir in the pecans.


 Pour the pecan mixture into the hot pie shell.

Bake on the middle rack until the pie looks set and yet soft, like gelatin, when gently pressed with the back of a spoon, 50 to 60 minutes. Transfer the pie to a rack; cool completely, at least 4 hours. Then to really make magic, put it in the freezer. Promise me you'll do it with a least one piece, just to try. I bet you'll love it!!

Photobucket

April 4, 2012

Mango Lassi Drink

 
We just got back from a wonderful vacation in Maryland and Virginia. We travelled around the coast and saw LOTS of the Chesapeake Bay. I miss living in the in area every time I go back, but then I look at the housing costs and I realize why we live in Georgia. One thing I loved while we were up there was all of the great ethic restaurants. We ate Vietnamese, Indian, Persian, and seafood. All of those make up for the awful food that I feel makes up most "American" restaurants. I get so sick of seeing chicken fingers and mac n cheese on kids' menus that I want to scream. I mean...really my kids don't want that junk everyday and I sure don't want them to eat it. Where are the veggies in today's restaurants?? We all felt a little better when we ate at the Vietnamese place and could enjoy the large adult portions to share. With four kids, we will order three adults entrees and share everything between us all.

We all enjoy the fresh taste of a mango lassi when we eat Indian food. We sometimes order tandoori chicken, spinach paneer, naan, vindaloo, lamb kabob, or aloo matar gobi. About the only Indian recipe I ever make at home is the mango lassi. It's easy and doesn't require a ton of spices. In fact, if you made the Chai Tea recipe (which is the other Indian recipe I make at home), you have the one spice you need, cardamom. You could always use the leftover cardamom to make this beautiful bread wreath for Easter.

Lassi's are a creamy yogurt drink that my kids love. They will often request it for a birthday party menu. It's so easy to make at home and perfect for an afternoon snack.

Mango Lassi

Ingredients
2 sm ripe mangoes or 1 large
3 Tbsp sugar
1 c yogurt
1/2 c milk
ice (optional)
Peel the mango and section the flesh. The best way to do this is to cut the entire fruit all the way around with a paring knife twice. In other words cut through the skin all the way around the fruit from top to bottom and then turn it 90 degrees in your hand and cut top to bottom again. Then you have a section of skin to grasp at the top that you pull off if the fruit is very ripe. If the skin does not come off easily your fruit is not ripe enough. When you get the skin off you need to cut the fruit away. The pit of a mango is shaped like a flat oval and it's pretty big so keep that in mind when you are cutting.
The fruit goes into the blender with the other ingredients. Blend on high until creamy and smooth. I like to add ice and blend some more at this point to make it more like a smoothie, but that depends on your personal tastes.
 
Photobucket

LinkWithin

Related Posts Plugin for WordPress, Blogger...