April 20, 2011

Cardamom Bread Wreath

Fabulous bread for Easter morning (or any other special morning). It's subtlety flavored with cardamom and covered in glaze. The braid looks beautiful and oh so complicated, but it's just as easy as braiding hair. You will look like Martha while being as serene as Mary (Luke 10:38-42), able to sit at the feet of Jesus and worship with joy this Easter.

Cardamom Wreath
2 packages yeast
1/3 c warm water
1/2 c soft butter
3/4 c sugar
3 eggs
12 oz (1 can) evaporated milk
1/4 c sour cream
1 tbsp grated orange peel
2 1/4 tsp ground cardamom
2 tsp salt
7 - 7 1/2 flour
1 c powdered sugar
1 tbsp milk
1/2 tsp vanilla or almond flavoring

Proof your yeast by sprinkling it
over the warm water in the measuring cup and let sit until foamy. In large mixing bowl cream the butter and sugar. Beat in the eggs, milk, yeast and water, sour cream, orange peel, cardamom and salt. Mix well. Beat in 7 cups of flour to form a soft dough. At this point you can knead by hand or switch to a dough hook. Knead about 6 minutes until smooth and elastic, adding only small amounts of flour to keep it from sticking. Place in a greased bowl, cover with plastic wrap and let rise in a warm place for about 1 hour.
Punch down dough, let it sit (rest) for about 30 minutes. Then divide into 6 portions. Shape each portion into a 24" long rope. Please three of the ropes on a greased baking sheet and braid into one long rope. Then shape the straight rope into a circle, pinching the ends together to form one continuous ring. Cover again and let rise about 45 minutes.
Bake at 375 degrees for 25-30 minutes until golden brown. Cool on wire racks.
Combine milk, powdered sugar and vanilla in small bowl. Whisk until smooth and pour over wreath after it's cooled completely.
This recipe makes two loaves, one to keep and one to share with a neighbor along with the Good News of Easter morning: Jesus died and rose again so that our sins would be forgiven, allowing us to enter the kingdom of heaven.

Other Easter items you might also be interested in: a Spring Table Setting, a Sedar Plate meal, or this lamb "tracing" cake.
Photobucket

April 14, 2011

Easter Granola Bar Nests

These fun Easter nests are perfect for a snack. In our preschool, everything has to be healthy which I love, but it means no cute iced cookies for the Easter party. :(  I had to come up with something else. Hummmm, what to make? Ah-ha, we love granola bars! This recipe tastes like a Quaker oatmeal breakfast bar, so perfect for those who like a chewy taste. If you like a sweeter granola bar, pick this one. I usually bake a 9x13 pan or sometimes in muffin cups. Then I put plastic wrap on each one, throw them into a rubbermaid container and into the freezer. Whenever we need a to go snack or a lunch box filler, pop one in, already wrapped!

For the Easter celebration, I decied to make the granola "rounds" and make them into nests. If you want to make nests, you just depress the middle to create a dent before the "round" cools off. Since I couldn't fill it with jelly beans or my personal favorite Easter candy, Cadbury Mini Eggs, I filled them with yogurt covered raisins (strawberry and vanilla flavored). When we talked about eggs and where they come from we also got to talk about how close to perfect egg are and compared them to the how perfect Jesus is! We talked about new birth and Jesus' resurrection. It was a great snack for our Easter celebration.


Chewy Granola Bars

2c oats
1 c brown sugar
1/2 c wheat germ (in the cereal isle in a jar)
1/2 raisins, optional
2 eggs
1/3 c melted butter
1 tsp vanilla


Preheat oven to 350 degrees.

Combine oatmeal, sugar, wheat germ and raisins in a large bowl. Combine eggs, butter and vanilla in a small bowl. Add the wet ingredients to the dry and mix well.  Press into a greased muffin pan or for bars, press into a greased 9x13 pan.

Bake at 350 for 25-30 minutes. For nest, press the center down while still warm. For bars, cool 10 minutes and then cut while still warm. Store in airtight container.

When I served the nests to the preschoolers we added another cute idea: "sunny side up eggs".  This was something I saw as an April Fool's joke, but it works for Easter too. It's vanilla yogurt pooled on a plate with a dried apricot in the center...it tricked the kids and they got a giggle! I had to do something funny since we celebrated on April Fools Day!!


Photobucket

April 13, 2011

Fun Tissue Paper Pom Poms


I saw these great looking pom poms in Martha Stewart Living magazine and knew I wanted to make them for our playroom. They were super easy and really took no time to make. I do recommend using heavy duty tissue paper and not the cheapy thin kind. That way when you pull the layers apart - very gently - you don't rip the tissue and they also look fuller. You also need scissors and a little bit of thin floral wire
I made another one in red for the boys room because they turned out so cute. I hung the ones in the playroom along with a lime paper lantern I got from Hobby Lobby using fishing line so you wouldn't see it. You could also use ribbon to hang them. After a friend of mine saw these, she went and made pink and white ones for her baby girl's nursery, which looked fantastic.

Here are the step-by-step directions from Martha. I've also included my two cents from my experience.
Step 1
Stack eight 20-by-30-inch sheets of tissue. Make 1 1/2-inch-wide accordion folds, creasing with each fold.

Step 2

Fold an 18-inch piece of floral wire in half, and slip over center of folded tissue; twist. Also, I wasn't the most perfect folder, so my ends when folded looked more ragged than this photo, but it doesn't really matter due to the trimming you do next. With scissors, trim ends of tissue into rounded or pointy shapes. My orange pom pom is trimmed with rounded edges and my yellow one is trimmed with pointed ends to give you an idea of the difference.

Step 3
Separate layers, pulling away from center one at a time. I can't stress this enough, this is the most time consuming part of the project. You must be GENTLE and slow when pulling the layers apart. You should also pull them apart all the way to the center where the wire is. This will give it fullness and body.


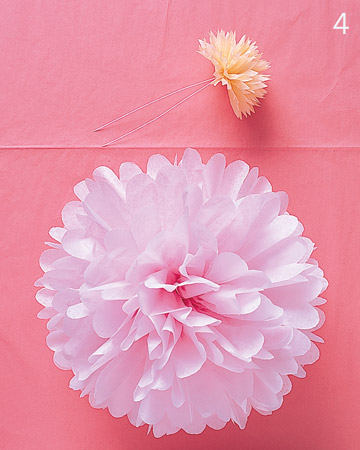
Step 4
You should now have a fluffy ball of tissue (see photo above to make flat one sided for flowers). Bend wire into a loop and twist to secure. This will hold the hanging filament or ribbon.
I hung mine with fishing line so you couldn't see it. They are a perfect, fun, inexpensive and easy decoration for just about anywhere. You could use them for a birthday party or baby shower.

LinkWithin

Related Posts Plugin for WordPress, Blogger...