Showing posts with label appetizers. Show all posts

January 31, 2014

Cancer Free!!!!!! (oh and, Jeweled Black Bean Dip)


Thank you for all of your prayers, cards and virtual flowers. We have made it through cancer and out to the other side. Abigail is doing well and is gaining back weight. She is officially cancer free! She will have three years of follow up, but we couldn't have asked for a better result. I am so grateful to God, the doctors and all of our friends and family who supported us. It really DID take a village. I wish I could thank all of you who helped us, I couldn't have done it without you. Each of you said, "Oh it's nothing", but added up it was a HUGE something!

I am going to be posting very little for this year of 2014 since I have decided to enjoy the last year of my preschooling time, but I do want to record fun birthday parties and a few special recipes - mostly to keep in one place for myself!! ;)

During the dark days of chemo, so many people brought us great meals. I mean...De...lish..us! I won't ever be able to thank those of you who helped us enough. It was so amazing to be cared for.

There were meals that we received that I've made over and over. This recipe was one of them and it has become an often requested one (thank you sweet Katie). In fact, I will be making it AGAIN on Sunday for the ten year old's Super Bowl party. (YES! - we ARE back into full fledged party mode and love being able to have people over.)


Jeweled Black Bean Dip

Ingredients
2 minced cloves of garlic
3 tbsp minced onion
2 tsp salt
1/4 tsp cayenne pepper
2 tbsp sugar
1/2 c olive oil
6 tbsp fresh lime juice
1 tsp lime zest
1/2 c chopped fresh cilantro
30 oz of black beans (rinsed and drained if you are using canned)
1 1/2 c of corn, fresh or frozen thawed
2 diced red bell peppers
1 pomegranate, seeded
2 avocados, rough chopped (do not use overripe ones)

Combine first 9 ingredients in a glass jar and shake OR put all except oil in a bowl and then slowly whisk in the oil to the rest of ingredients.

Combine beans, corn, peppers, and pomegranate seeds in a bowl and pour dressing over top. You can let this sit for a few hours or overnight. Then right before you serve it, chop the avocados and stir in gently.

Serve with tortilla chips.
Photobucket

August 21, 2012

Gazpacho - Cold Tomato Soup


It's the end of summer and I love this time of year. For me, it's the change in seasons that I adore. When winter ends and spring begins I feel alive and joyful. When summer warmth comes I am ready to run around in flip flops and tank tops. I have to say, I really think fall is my favorite. Warm days with crisp nights. We get out the marshmallows and drag branches to the fire pit for smores bonfires with friends. We go camping and hang out watching the starts. Fall is bliss.

I've worked all summer long, in the garden and the harvest is paying off, but these days my garden is winding down. The beans are finished, the squash kaput, the peppers producing less each day. Today we pulled up two dead tomato plants, but at least the other are still going. We have different varieties of tomatoes planted. Last year I introduced the mini orange ones and they were amazing. This year, my new plants were Cherokee Purple and Mr. Stripey heirloom. Both had interesting color, but tasted not as bold as the traditional Better Boy that is our mainstay. They were also not as pest resistant. In fact, I'm pretty sure more bugs enjoyed my Mr. Stripey than I did! 

Better Boy, Purple Cherokee, Mr. Stripey all ready for soup
I did can (that soooo should be "jar") some of these tomatoes, which I will share with you tomorrow. It was pretty easy considering I usually only can jam. The canning jars look beautiful with the different color tomatoes in them.

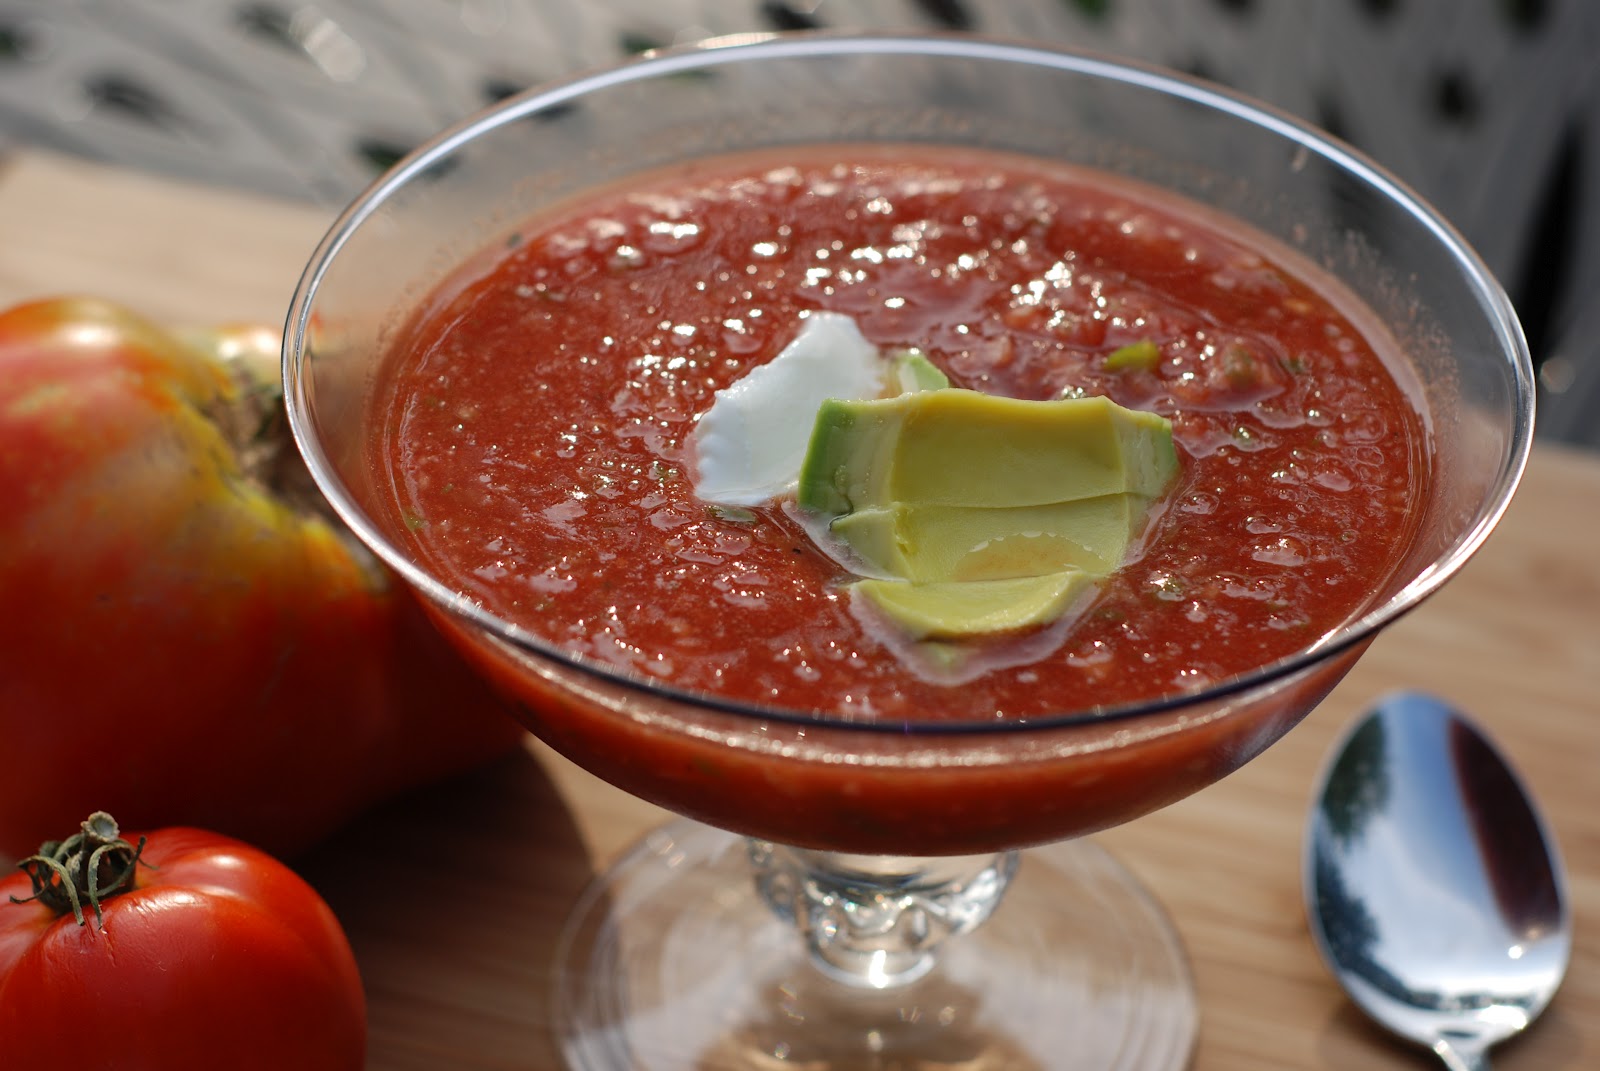
Today however, I wanted to enjoy the end of summer. Today I made gazpacho. I have to say, I've never...ever had gazpacho. I'm sure it wasn't for lack of it being offered. My Mom loves the stuff, so I know she tried to get me to like it. I always declined. As usual, my Mom was right, I should have come around much sooner than this.

I'm pretty sure it was the name that put me off. It sounds so...so....tough. Like it might grow hair on your chest tough. Like take your lunch money away tough. Gestapo tough. I was intimidated. But as I've said before with souffle - wusiness needs to be confronted. I had to make this stuff. I'm proud to say...

I...have..conquered...gazpacho!!! And I actually liked it.

Of course, now that means I want you to conquer gazpacho as well (or at least be able to spell it). You may be an old pro at it like my Mom, or you may be a wussy newbie like me, but if you like fresh tomatoes, you are going to love this recipe. All you need is a food processor - no cooking involved. That's my kinda summer cooking.

Gazpacho
from Southern Living

8 tomatoes, peeled and chopped (I used several types of tomatoes, just be sure they are flavorful and ripe)
2 cucumbers, peeled and seeded
1 large bell pepper
1 small red onion, peeled
1 jalapeno pepper, seeded
1 large clove garlic
1- 32 oz bottle of tomato or vegetable juice
1 lemon, need 1 tbsp zest, 1/4 c juice
1/3 c red wine vinegar
2 dashes of hot sauce
3 tsp salt
1 tsp pepper
1 tsp paprika
sour cream
avocado

Cut tomatoes, cucumbers, pepper, and onion into quarters. Put all the chopped vegetables, the jalapeno and the garlic into the food processor. Pulse until chunky (or you can keep going til it's smooth if you don't like texture in your soup), scraping the sides when necessary. Pour into a large plastic container and add the rest of the ingredients. Stir, cover and put in the fridge for at least 8 hours or overnight.

Serve with sour cream and a sliced avocado. 

If the Tomato Peach Salad is summer on a fork, this is summer on a spoon! Thanks Mom for having patience and letting me grow into my taste buds.
 
Photobucket

August 1, 2012

Tropical Pink Dragonfruit Limeade


I've discovered a tropical paradise here in South Florida....Robert Is Here produce stand. Robert has one of those fun stories that I love sharing with my kids, stories of personal achievement. As Robert told me himself, it's a lesson on hard work, honesty and integrity. 
Robert and I talked...a lot!
Robert started his business at the tender age of six years old. He set up on a road to sell his father's cucumbers with a giant sign that said "Robert Is Here" and the name stuck, so the place is still called Robert Is Here. He soon progressed into hiring his neighbor to work for him when he was at school. Today, many years later, his business is still thriving with many friendly employees, loads of exotic fruits, fresh vegetables, and the MOST amazing milkshakes!! We came for the key lime milkshake, which was a perfect blend of sweet and tart - delicious, but we loved the mamey and the guanabana flavored milkshakes just as much, if not more. They were made with fresh fruit and they were delicious, creamy and vanilla with the fruit taste too - seriously good stuff. 
Sharing a mamey milkshake
We stopped at Robert's on our way to Key Largo, the northern most key and had such a delightful time, we stopped at Robert's again on the way home. We stocked up on avocados (and made guacamole three times while on vacay), the most delicious juicy Kitt mangoes that the staff was happy to slice up for us. They were so perfectly ripe that the juice dripped down our arms while eating them.
juicy mango!
We enjoyed longans (like lychee), key limes, jack fruit, tomatoes, and intriguingly named dragon fruit. 
Source: Tropical Fruit Nursery
Dragon fruit is strange looking from the outside, but the variety we had was beautiful fuchsia pink with small black seeds on the inside. I cut it in half and just scooped the fruit out with a spoon, much like an avocado.

Look at this beauty...

With this color, I knew I wanted to make something fresh to show it off. I figured it would make a beauitful drink and boy was I right. We had some limeade concentrate in the freezer which I mixed up and added the chopped dragon fruit. When stirred up, it all became this gorgeous pink color. It didn't change the flavor of the drink because the dragon fruit flavor is so mild, something like strawberries. I think this fruit would make an incredible mixed drink with natural coloring.

Tropical Pink Dragonfruit Limeade
1 can limeade concentrate
1/2 dragonfruit

Mix up limeade with water and stir in chopped dragonfruit. Let sit in fridge for at least 30 minutes to overnight. The color will deepen over time. Add tequila for an adult dragon-rita.
 
We tried it in orange juice too and it created a beautiful translucent coral color. A a little of the fruit goes a long way in coloring a drink so I had plenty of fruit to make different drinks.

Next time you are having a party and need a punch or fun drink to make, give dragon fruit a look. You won't be disappointed with this kinda color!!


Photobucket

July 9, 2012

Fresh Chunky Guacamole: Only 7 Ingredients

I'm addicted.


I need this stuff at least once a week. I have been known to serve this to my family with veggies and chips and call it dinner. That can be dinner - right?? It's not wrong to wish you didn't have to feed your children is it? Especially when your air conditioning is NOT working. Ugghh. Hopefully it will be fixed today and then I'll feed my kids a real dinner...promise.

This recipe showcases the best in summer. Much like the Summer Fresh Peach-Tomato Salad (which you absolutely MUST make in July and August when the tomatoes and peaches are plentiful and just dripping with flavor.) Using what's in season makes everything better. If you haven't tried my new seasonal search categories, you need to check them out. Look down on bottom right side. Click on "summer" and you will find all kinds of delights perfectly in season right now.


I first tasted this version of guac at On the Border Mexican Restaurant. We went with my parents and my brother and sister-in-law to celebrate my Mom's birthday. I had never been there, mostly because I like Mexican food the way I make it and not out at restaurants. I have to say I LOVED the guacamole there. The kids and I were fighting over who could hold the dish!! In fact, I don't think my sister-in-law (who actually ordered the guac) got more than one chip's worth. Sorry Nadia :) The tricks on this recipe are no garlic and lots of fresh cilantro. Very yummy.


Fresh Chunky Guacamole

Ingredients
3 tbsp minced red onion
2 tbsp chopped fresh cilantro
1 chopped tomato
1 tbsp minced jalapeno 
1/4 tsp salt
1/8 tsp pepper
2 limes
4 ripe avocados


Put the minced onion in a medium bowl. (Hint: Mince the entire red onion and store the remainder in a baggie in the freezer for the next batch of guacamole.)
 Strip the cilantro from the stems and chop the leaves, add to bowl. Chop the tomato. I know many people tell you to discard the insides, but they taste the same and really, I'm just too lazy, so I chop the whole thing and add it to the bowl, just try to shake off some of the tomato juice, or blot it with a paper towel, so you won't have runny guac. Mince the jalapeno without the seeds. Wear gloves when you do this. I have a box of these kind that we use for spray painting, car engine work, and cutting fiery jalapenos. Put the 1/2 tbsp jalapeno in the bowl and if you have some left, bag that too and put in the freezer (I actually put mine in a canning jar and store in the freezer). Give the mix a little stir. If you want to take this to a party, just stop here and bring the avocados and lime with you to the party. Then continue with the steps below when you are ready to serve.

Cut the avocados in half, working your way around the big pit. Twist the avocado to separate the halves. Then cut straight down into the pit with your sharp knife and twist to remove it. Use a spoon to scoop out the flesh and dump into the bowl with the other ingredients. Squeeze the lime juice over the top of everything. Then mash with a fork. I like it chunky so I don't mash around very long. Serve immediately since the avocado will brown even with that lime juice. Ole!


Photobucket

May 27, 2012

Pickled Pink Onions


While I was browsing the most recent blog I was assigned for Secret Recipe Club, when I made the Spring Green Risotto, I found these beauties - Pickled Onions. Not something I had ever eaten plain or made, but intriguing and oh, so simple. Kate at a Spoonful of Thyme had whipped them up to use with her tacos and fresh made salsa, but I had another idea in mind. They just seemed the perfect little topping for deviled party eggs. {When our kids asked why they were named deviled egg, I couldn't explain, so we adopted my Aunt's name for them...party eggs. Much more descriptive I think.}

I pickled an entire purple onion, so I had plenty to go around. Some of them, I served when we had friends over for barbecue. We put them on our barbecue sandwiches, instead of the traditional pickles like I normally do. I use a slow cooker recipe that has a can of Coke in it, because I DO live in Atlanta. I will share this recipe with you next week, but here's the photo (with traditional pickles).


Anyway, after the cookout and smore's roasting, there were plenty of the lovely pickled onions left over, so I came up with the party egg idea. Notice how one of them looks like the pink breast cancer ribbon??!!  How cool is that? I'm thinking fund raising party for anyone walking to raise money.


The last few of the onions got chopped up and tossed in my favorite broccoli salad. The one with mayo, red wine vinegar and Parmesan cheese? I could eat that salad almost everyday, even without the bacon. On your next barbecue or party, whip these beauties up and see what you can use them for. I'd love to hear what you come up with.

Pickled Pink Onions

Ingredients
1 med red (purple) onion
1/4 c apple cider vinegar
1 tsp sugar
2 tsp salt

Thinly slice the onion. Mix the vinegar, sugar and salt in a bowl. Add the onion slices and let sit in fridge for at least 30 minutes. Will keep for 2 days in fridge.

In hindsight, I'm guessing you could use the pink salt liquid that is created for pretty pink pickled eggs!


Photobucket

February 20, 2012

Soft Pretzel Bites


Two months ago I started participating in what's known as the "Secret Recipe Club". You may remember the homemade Butterfingers. The fun of this adventure is discovering new recipes and bloggers, never knowing what to expect. It's all a big secret until Reveal Day when we all find out who made what from who's blog.

I opted for something salty this time - Soft Pretzel Bites. I've made Soft Pretzels before but we made them in the traditional twisted shape. This recipe forms them into much easier to shape "nuggets". The other difference that I was curious about is the use of butter in making them instead of shortening. I wondered if it would change the texture or make the dough more difficult to work with. I'm happy to said it did neither and this dough worked perfectly for us. Just keep in mind, using butter means these pretzels won't keep fresh as long as the shortening ones, so plan on eating them or freezing them. I did both and the frozen ones were just as delicious when thawed on the counter at room temperature.
The recipe comes from the blog Making Memories created and nurtered by my twin-in-another-life, Erin. Just like me, Erin is a little obsessed with Family Fun magazine. All you have to do is search either of our our blogs for Family Fun and you'll see tons of things we've done - many of them the exact same projects (we just made the gumdrop arrows for Valentine's Day)! I actually cracked up when I saw the header photo on her blog because she has a photo of the milk jug Halloween ghosts just like the ones hanging in our basement right now!! Now if we could just get Family Fun to hire us as testers - right Erin?

Erin is one of those people that I'm in awe of. She's a single mom with two precious kids. I really am amazed at single moms. I mean there's no break, no..."wait til your Daddy gets home to deal with you". And she's not just going through life, she's making a FUN life with her obviously happy kids. She makes time to say, "yes" and I love that about her. Much of her blog is creative and clever ideas for crafts, gifts or goodies. When I read the recipe for Soft Pretzel Bites it sounded like she decided to make them almost as a challenge and she was pleasantly surprised at the results. They turned out better than she expected and easier than she expected. I hope you take the yeast challenge and your results are as delightful as Erin's.

Soft Pretzel Bites
(recipe originally adapted from Bobby Flay)

Ingredients
1 1/2 c warm water
2 Tbsp brown sugar
1 pkg active dry yeast (or 3 tsp of bulk yeast)
1/3 c unsalted butter, melted and cooled
2 1/2 tsp Kosher salt
4 1/2 c flour
vegetable oil
-----
6 c water
3/4 c baking soda
-----
1 egg beaten with 1 Tbls. cold water
Coarse sea salt, poppy seeds, sesame seeds

Combine water, yeast, brown sugar in glass measuring cup to allow yeast to proof (which is a fancy way of making sure the yeast is alive and awake). If you don't get foam in about 5 minutes you may have killed the yeast with water that was too hot OR it's not awake because the water was too cold OR the yeast is too old. Yeast is the big scary part of yeast breads (that's why it's so prominent in the name - to scare you off). Really yeast is easy, you just need to make sure it's alive and kickin. Proofing is way to make sure you aren't going to end up with unrisen flatbread. Once you have proofed it, you know it's gonna all work out. If you don't get foam, just throw away what you mixed up and try again. The water should feel warm to your fingers, but not hot.
this is what it looks like when the yeast is first added to the water (with a sprinkle of brown sugar)

this is activated yeast: foamy and smells yummy
Once your yeast is all foamy goodness, pour it into a mixer bowl and add the melted butter. Make sure the butter has cooled so it's not raging hot and kills the poor little yeasties. Mix on low to combine. Add the salt and 3 1/2 cups of the flour into the bowl and mix on low speed until combined. This is where a dough hook and a stand mixer come in handy, otherwise you are kneading the dough by hand on the counter. Incidentally, you could easily start this recipe in a bread maker appliance, just take the dough out after the first rise and hand shape it and continue following the recipe from there.

You want to knead the dough in the mixer for about 5 minutes until the it's smooth, adding small amounts of the remaining 1 cup of flour a little at a time until the dough pulls away from the sides of the bowl, forming a ball. You may not use all of the flour if it's a dry day or you may need a little more if it's a humid day outside, but you shouldn't vary more than 1/2 c more or less in what you need. When the dough is "right", the sides of the bowl should be really clean and the dough should all be gathered around the dough hook. The dough should feel soft and elastic. "Like your tummy", my darling 6 year old innocently stated. @#!! Ah the honesty of kids!

Put your dough into a clean greased (is that an oximoron?) bowl and cover it loosely with plastic wrap. Let it sit in a warm place (you may remember I use my turned off oven with the light on in the winter) until it doubles in bulk. This should take around 1 hour unless your kitchen is pretty cold. You can figure out if yeast bread is ready with the poke test. You poke your finger gently into the risen dough and see what happens. If springs back - then it's not ready. If the dent stays put - it's perfect. If the poke makes the whole thing collapse - then it's overrisen and you need to start over from the kneading stage to try to salvage it. All of this SOUNDS complicated, but it's not - I promise. You just have to try it out to see really it's not hard. It takes a little planning since there is waiting around, but it's not hard. When the dough passes the poke test, you need to gently deflate it by folding it or "punching" it down. That means put your fist into the middle of it. It's not a shazam move, but more of a gentle push. Then let the dough rest for 5 minutes or so (which means just leave it alone for a few minutes).
While the dough is resting you can get ready to make pretzel magic. Preheat your oven to 425 degrees. Then you need the secret to turning regular bread into pretzels. The trick is to boil the dough in water before you bake them - that's what gives it the lovely chewy texture. Last time, I wasn't too sure about put raw bread dough in pot of boiling water with baking soda. I mean, that sounds kinda gross, but it works. Whoever discovered this technique must have been a little crazy. *Do I hear a homeschool lesson coming up??*

Put your 6 cups of water in a pot or deep skillet and add the baking soda. Bring that to a boil.

Instead of watching and waiting for the pot to boil, go ahead and shape your bites. Cut the dough into 8 equal pieces, using a bench knife makes this much easier (my 8 year old was happy to volunteer). Roll each piece into 22" long ropes. If the dough is hard to stretch, it hasn't rested long enough. Then cut the rope into small bites approximately 1" wide. You can roll these into or just leave them cut like tiny squares.
By now your water should be boiling and you are ready to cook. Drop the individual pieces of dough into the boiling water working in batches. Watch as they magically rise to the top of the water within about 30 seconds. When they float fish them carefully out and put them on greased (or my favorite silicone mats) cookie sheets.

When you have a tray full of boiled bites, brush some of the egg white mixture over the top and sprinkle with course salt, poppy seeds, sesame seeds, Parmesan cheese, whatever floats your boat.

Bake at 425 degrees for 15-20 minutes. Watch carefully so they get brown, but not burned.
A few minutes after these started coming out of the oven, everyone of my kids was clamoring for some. I don't think they even waited for them to cool off. Even the baby stuffed one in her mouth. That girl loves her food just like her Mommy! :) Thanks Erin for sharing this bite sized snack!

Don't forget to enter my giveaway for two silicone baking mats to celebrate my birthday today!!
Photobucket

February 14, 2012

"Like Outback Steakhouse Bread" - Pumpernickel Loaf

My husband and I love Outback Steakhouse for DNI aka Date Night In. Tonight will be one of those nights. There is NO WAY I'm going out to a restaurant, waiting for a table, crammed in with others on Valentine's Day. All the while, thinking about how long it's taking and we're paying a babysitter. Love is in the air, but not when you're paying through the nose. No thank you. Tonight we will feed the kids an early dinner of leftovers and put them to bed on time. Then we will join up in the kitchen and either create something for just us, sharing time talking or pick up something from a restaurant without setting foot inside the building. That's why I love Outback (thanks Sandy for turning me on to this one). You can call or order online and when you pull up they will bring it right to your car. Raining outside where you live? Already in your comfy *ugly* pants? No problem, cause you're not getting out of the car! No, I'm not getting paid to advertise for Outback, in fact I'd like to let you in on one of their secrets - they are not really Australian. Shhhh, don't tell, but if you want Australian, you need a meat pie or Vegemite or maybe a Lamington cookie. It's funny what we American's will believe, guess it's like thinking Papa John's is Italian food.

This doesn't mean I don't love Outback, I do. I love the steaks, the salads, and their bread. Delicious. I wanted to recreate it at home for those months when it's just not in the budget to pick up takeout. So here's my best recreation to date. You're gonna love it (I told you I was in a baking mood).
Sweet Pumpernickel Bread - like Outback Steakhouse

1 pkg yeast or 3 tsp yeast
1 1/4 c water
1/3 c molasses
1/4 c sugar
1 1/2 c rye flour
1 c whole wheat flour (you can sub with white, but it won't be as chewy)
1 c white bread flour
1 tbsp vital wheat gluten (or just use another packet of yeast)
1 tsp sea salt
2 tbsp cocoa powder
2 tbsp vegetable oil

Put the yeast in warm water (not hot) with the molasses to proof it {see here for details about bread baking}. Combine sugar, wheat flour, rye flour, 1/2 c of the the white flour, gluten, salt and cocoa in large stand mixer bowl, whisk together. Add yeast mix when it gets foamy. Knead the dough with dough hook. Add the oil and knead again. Add the remaining 1/2 c of white flour as needed to form a ball around the dough hook. The dough should cleanly pull away from the sides of the bowl. Place dough in greased large bowl and cover loosely with plastic wrap.

Let rise in warm place (like your oven with only the light on) until doubled, maybe an hour depending on how warm your kitchen is. Deflate the dough. Form into a greased loaf pan. Cover loosely again and let rise for around 30 minutes. Preheat oven to 350 degrees. Carefully remove the plastic wrap and put in hot oven. Bake for 50 minutes. Cool on wire rack only until it won't burn your fingers because this stuff is delicious warm!

Photobucket

January 18, 2012

Old Fashioned Date Nut Loaf

You know those gifts that somebody gives you and you thank them and you all go on your merry way, only to realize later how incredibly AWESOME that gift really was? This was one of those. We were given a loaf of Date Nut Bread and I thought - "well thanks, very nice". It wasn't until I actually opened this 5 lb brick of a loaf, cut a careful slice and bit into it that I realized what a gift it was. The taste is delicious: sweet, salty, nutty, crunchy and yum! I'm sure the cake was a labor of love to make and an expensive one at that with all of those nuts. I had to have the recipe and the precious givers, Linda and Mario, were happy to share...well Linda was happy to share. Mario might have had other ideas. When he delivered the cake, he told my husband, "if you don't like it - that's okay, just give it back to me". That kinda intrigued me. I mean, these are generous and giving neighbors we are talking about, what's this about giving it back?? Turns out, this is his FAVORITE cake of all time and he just wanted to make sure it was appreciated and not haphazardly scarfed or tossed out. This cake is THAT good. I'm very grateful she twisted his arm because it was delicious - every last bite. I was a little hesitant to share it with my nut and date loving Dad, but it was his birthday, so I relented.
The recipe comes from an old cookbook, which are some of the ones that I most enjoy and least use. I think what throws me off is the lack of pictures. There aren't usually photographs of the recipes and that's what gets my attention. I know the recipes are delicious and I usually enjoy what I make from my older cookbooks, but I just don't do it enough. I figure I might reignite interest in these older cookbooks if I make a few recipes and take some (hopefully yummy looking) photos. I'm really working on my photographs. Everytime I see the one of the hot chocolate cones on pinterest I have to cringe - it's terrible! I did just get a new lens on a girls trip to NYC, I went to B&H photo. That place is amazing! There are at least 47 check out registers - it's busy and big like the rest of Manhattan. Anyway, the lens I got promises to make my food tastier looking, fresher, healthier and all around yummier - that's what the sales clerk told me - really!
Can't you see the delicious difference in this Date Nut Cake? I guess that's cheating since I didn't actually make this cake, but it does look amazing. So if you can spring for the pecans - or you have a pecan tree in the backyard, this is a cake you want to make. It will last a very long time in the fridge and you only need a little slice to go with a cup of fresh brewed coffee. It's perfect for breakfast or an afternoon snack. I figure it has the nuts so you've got a little protein - that makes it as healthy as a power bar in my mind! It kinda reminds me of another loaf I just made with nuts and dried fruits in it, only that one I turned into crackers. I promise to share that recipe very soon, but for now enjoy Old Fashioned Date Nut Loaf.

Date Nut Loaf
from Farm Journal Christmas Book
4 eggs
1 c sugar
1/2 c oil
1 c flour
1 tsp salt
1 lb pitted chopped dates
4 c pecans

Combine eggs, sugar and oil in large bowl. Beat well. Combine flour and salt in a bowl and whisk to mix and sift flour. Add flour to egg bowl and mix well. Fold in dates and nuts. Dump in a greased and floured loaf pan. Put loaf in cold oven and then turn it on to 300 degrees. Bake for 2 hours and then cover loosely with foil. Bake for 15 more minutes.

Photobucket

October 18, 2011

Happy Halloweenie! Mummy Hot Dogs

Are these a crack up or what?? My kids love them and so we usually make them sometime around Halloween. And really, who can resist a hot dog wrapped in a cresent roll?  It really only takes those two ingredients...hot dogs (I picked up bun-lenght for serious mummy's) and crescent rolls. Mustard is an optional ingredient.


Preheat the oven to 375°F. My generic package of crescent rolls contains 8 rolls. I pressed them into four flat rectangles, by combining two rolls together. I thought using a rolling pin would be a good idea, but don't try it. It's a sticky mess, fingers are the best bet.


Now you want to cut the bandanges, aka strips of crescent roll. I used my pizza cutter wheel, but you could use a knife. These don't have to be neat or even even. I managed to get 7 - 8 strips out of each rectangle. You don't want them too thin or they will break when picking them up off the counter. You don't want them too thick or they look funny on your mummy *groan*.

Wrap pieces of dough around each hot dog to look like "bandages," stretching dough slightly to completely cover hot dog. About 1/2 inch from one end of each hot dog, leave a space so hot dog shows through for "face." If you have gaps in your strips or overlaps, it only makes the mummy look more interesting and rustic.

On ungreased large cookie sheet (used my wonderful generic silicone mat as usual), place wrapped hot dogs. The naked ones look mighty chilly!

Bake 13 to 17 minutes or until dough is light golden brown and hot dogs are hot. With a toothpick of mustard, draw eyeballs and even a mouth if you like. How seriously easy is that????


Woooooo! Happy Halloweenie!!

Photobucket

LinkWithin

Related Posts Plugin for WordPress, Blogger...